It seems appropriate that my first post on this site be an exploration of its own technical underpinnings. That being said, before I get too far into the weeds, a bit of context. When I set out to build my site I had a few goals in mind. Those goals can be reasonably summarized as wanting to build a site from markdown files in Github, and self-host it using docker containers. Simple enough, but lets unpack that a bit:
Goals
- Self-Host
- Run all website infrastructure in my home, and avoid paying a hosting provider like Squarespace or Wix.
- Write all my posts in markdown
- Markdown enables easy text-formatting, and allows me to do all my writing in any number of great, markdown-supporting text-editors on basically any computing platform.
- Run all infrastructure in containers
- Running my web-hosting infrastructure entirely inside docker containers allows me to easily change what computer is running my website in the event that doing so becomes necessary or desirable. Migrating to another computer I own, to a Virtual Private Server (VPS) I rent, or to the Cloud with Azure or AWS container hosting– it all becomes trivial.
- Store the site as a repository in Github
- Site files being a Github repo provides me with backups and quick visibility into my site’s version history. Additionally, it works alongside the docker containers to keep my site mobile. If I decide to migrate hosts in the future, I won’t need to worry about transferring my site files manually. With them in Github, all I would need to do is initiate a git clone of my site’s repo on the new host, and the site files are ready to go!
With those goals in mind, I eventually landed on using docker containers of Hugo (to build my site), and NGINX Proxy Manager (to host it). If you would like to do something similar, and build a site like the one you are currently viewing, the below should be helpful! With that out of the way, lets begin.
Requirements
In order to successfully build and host a site using this method, the below are prerequisites:
- Own a domain name. Mine is wallacelabs.tech. If you do not already own one, I recommend purchasing from Hover or Google Domains. As part of owning a domain, you will have control of your domain’s DNS records. If you somehow own a domain but do not have the ability to manage its DNS records, you’ll have to get that worked out before proceeding.
- Own an internet-connected computer. This computer will be your web-server. Ideally, that computer will be a server in the sense that it is always on, and dedicated to server functions. While you could host your website on your everyday use computer, I would not recommend it. In terms of actual hardware though? It can be anything from a tiny Raspberry Pi to a massive EPYC Server. The important thing is that it can run docker, is connected to the internet, and is always on.
- Be able to manage port-forwarding rules on your network’s router/gateway. Port-forwarding on your router, along with setting your domain’s DNS records, are the two keys required to map traffic from the internet to the web-server hosting your site.
- Either a Static WAN IP, or a Dynamic DNS configuration. This is required in order for your domain’s DNS rules to reliably point traffic to the router on your local network. Most home internet connections do not have static WAN IPs, so you’ll likely need to configure a Dynamic DNS (DDNS) service. Stated simply, DDNS is a way of automatically informing your domain’s DNS servers of any changes to your home network’s Public IP Address. If you use Google Domains as your domain registrar, they have a highly convenient DDNS service built in. If you do not use Google Domains, I would strongly recommend using DuckDNS.

When your website is accessed from the internet, the traffic will follow this general path. Most of the above requirements exist in order to make sure that traffic can reliably traverse this path, allowing your site to be online.
If you can check all those boxes, you should be good to go.
Phase One - Getting Your Site Running Locally
Before worrying about domain DNS records, web hosting, and port-forwarding rules, we’re going to focus on getting a site running on your local network. First, we’ll setup the web-server.
Installing Docker
In order to setup containers for Hugo and NGINX Proxy Manager, you will need Docker installed on your web-server. Docker runs on Windows, macOS, and Linux, so the Operating System (OS) you use is mostly up to you. It is, however, worth mentioning that less setup is required on Linux and macOS. To run Docker in an ideal manner on Windows, you will need to configure Windows Subsystem for Linux (WSL) and subsequently, a Linux Distribution of your choice to run on WSL. This is not overly complicated, but it is outside the scope of this discussion. A post for another day, perhaps.
A quick aside: If you plan on using this system as a general purpose home server, in addition to using it as a web-host, it is definitely worth considering the security implications of doing so. By using a computer for web hosting, you are inherently opening up this system to the internet, and there is a lot to be said for the practice of isolating web-hosts on your network through any variety of means. A thorough consideration of these potential risks (and the network hardening measures which might be taken to mitigate them) would be a large digression, and thus is outside the scope of this discussion. Another post for another day, perhaps. For now though, suffice it to say that our risk factor here is not particularly large, due primarily to the fact that we are discussing hosting a static site, not a dynamic one. Had I opted to host a dynamic site using Wordpress, or something of the like, I would be singing a different tune. For additional reading on the security implications of static vs. dynamic sites, see here.
Begin by installing the Docker Engine using the instructions specific to your OS. Once Docker is installed, you can move on to setting up a Hugo container.
Setting up a Hugo container
To create my site, I utilized a container based on the Hugo Docker Image. Hugo’s Docker-Hub image is highly configurable, offering many different tags for specialized integration into custom web-publishing workflows. For my use, all I really wanted was basic container which, when run, provides an interactive shell environment where I can run Hugo commands. The below docker compose file will accomplish this:
To utilize this compose file to setup your own Hugo container, first, go ahead and download it. Then, open it in your text-editor of choice and update the volume mapping from *PATH TO SITE* in line 6 to wherever you would like your site’s git repo to live on your host system. I would recommend creating a folder called site at the root level of your host. If you go that route, just change *PATH TO SITE* to /site and you’re good to go. Lastly, open up a Terminal/Powershell session, navigate to whichever folder docker-compose.yml has been downloaded to, and run the following command:
docker-compose up
You should see the following in your Terminal session:

Now, open up Docker Desktop and you should see your container running, like this:
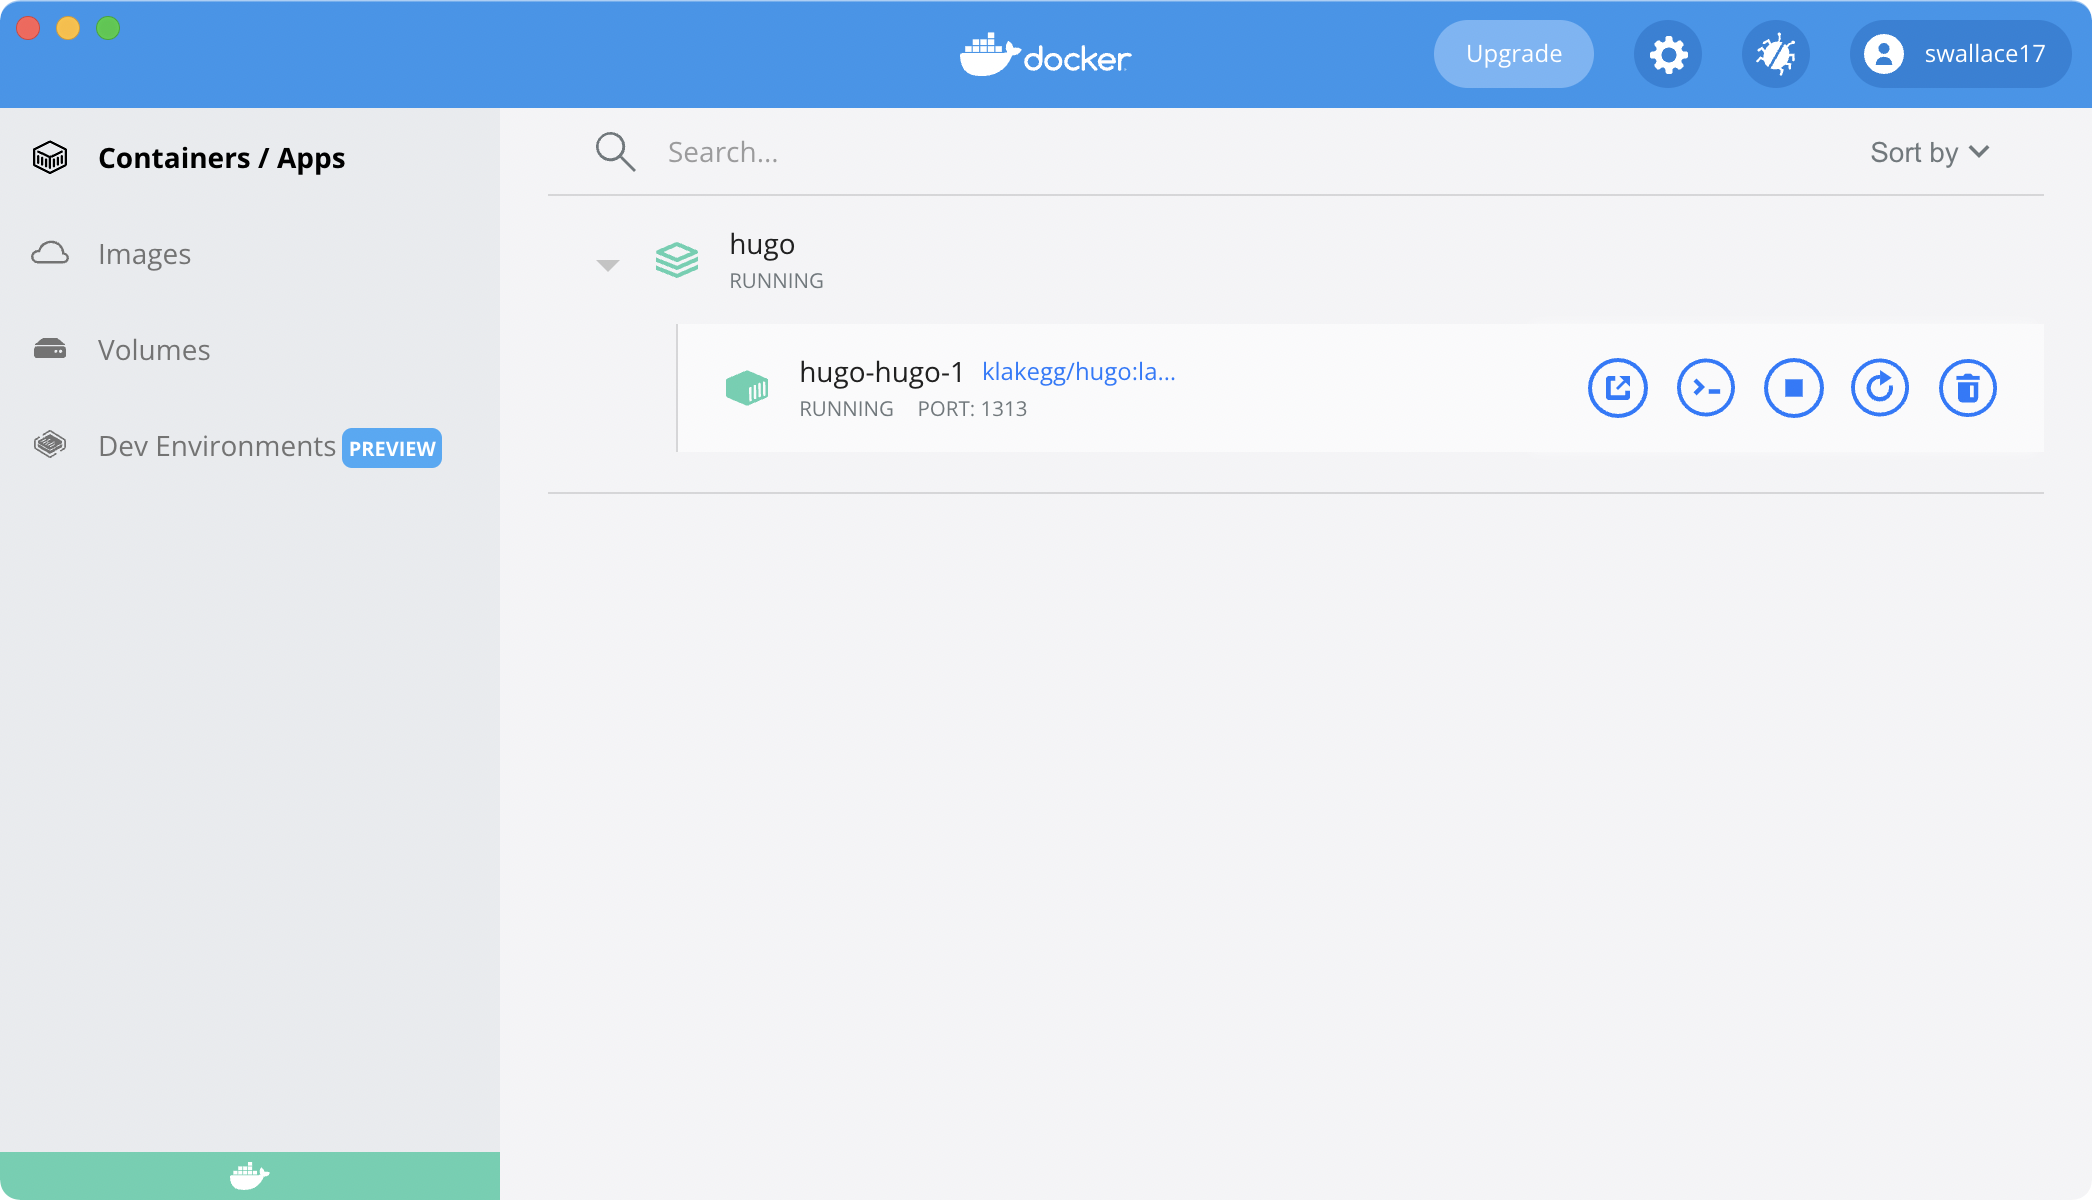
Note that Docker Desktop is only currently available for macOS and Windows, though a Linux version is in Tech Preview, should you wish to try it.
With the Hugo container setup and ready to go, you can now use it to create your Hugo site-template.
Creating your Hugo-Site
Now we’re in business. Click the “CLI” button in Docker Desktop to open up a CLI session on your Hugo container. This is how you’ll interact with the containerized Hugo program moving forward.
Your CLI session will have opened up inside the container’s /src folder by default. The /src folder is a volume mapped to the host. Whatever data the container puts in this folder, you will be able to access from the host, and vice versa. In docker containers, data inside a volume map like this one is also the only data that will persist after the container is stopped or restarted (i.e. the /src folder is the only thing that does not get deleted when the container stops). The rest of the container is rebuilt from scratch every time the container starts. Given you probably want your Hugo-site to not be deleted after you create it, you will want to create it inside the /src folder. Furthermore, whenever you run Hugo commands, you’ll want to run them in this folder. Why? Hugo commands have to be run against a Hugo-site, and this is where your Hugo-site will be located.
So, with a CLI session opened at /src, run the below command. When you do, a blank Hugo site template will be initialized as a git repo inside the /src folder. Just be sure to change *YOUR_SITE_NAME* to whatever you would like to call the repo containing your site.
hugo new site *YOUR_SITE_NAME*
The Hugo-site will be generated, and you will see the below message in your CLI session:
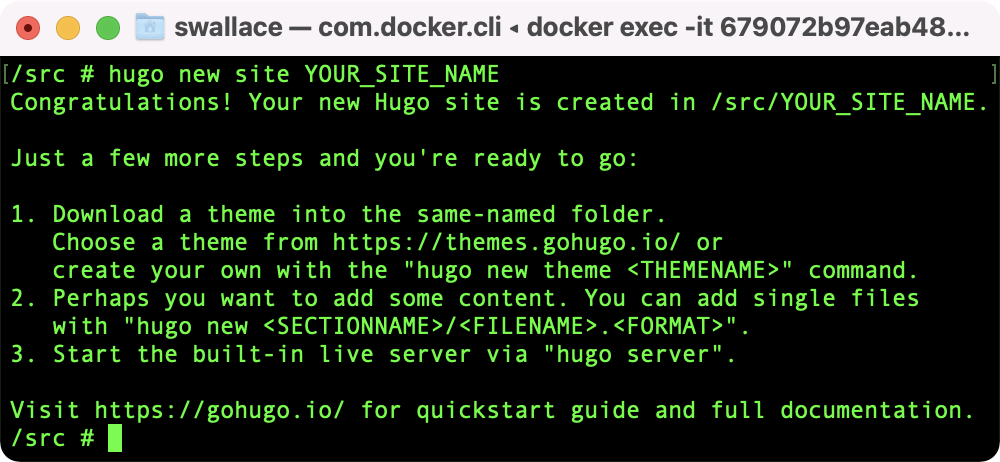
Success!
Next up, as indicated in that success message, you’ll need to pick a theme and install it. There are tons to choose from! If you are curious, the site you are viewing now is running on PaperMod. Installing your chosen theme is as simple as following the instructions provided by your theme of choice. These instructions usually consist of installing the theme as a git-submodule. This method is convenient as it allows you to easily update your theme by initiating a git pull on that submodule. Put more simply- you’ll have a one-click method of updating to a new version of your chosen theme in the future, should you want to do so. As you follow installation instructions, just make sure to run any necessary commands inside the Hugo container’s CLI. With a blank Hugo site template created and your theme installed, the foundation of your site is in place.
Creating your first post
With your site created, you can now create a quick test post. Before that though, a brief rabbit-trail about Leaf Bundles.
To Leaf-Bundle, or not to Leaf-Bundle
In a moment, you’ll run a command that will create the first post on your newly created site. That command is going to create the post as something Hugo calls a Leaf Bundle. I recommend creating all your posts as a leaf bundle because, among other benefits, it allows you to bundle post-images inside the same folder as as the markdown text-file of the post itself. If you do not create your posts as leaf bundles, any images for your posts will be lumped together, completely disorganized, inside a folder named
staticat the root level of your site. Not ideal. The below diagrams should help visualize this:
Leaf Bundle Post Structure
content/
└──posts
   └── YOUR_POST_NAME
       ├── image1.png
       ├── image2.png
       └── index.md
Non-Leaf Bundle Post Structure
content/
├── posts
│   ├── my-post.md
│   └── my-other-post.md
└── static
   ├── my-post_image1.png
   ├── my-post_image2.png
   ├── my-post_image3.jpg
   ├── my-other-post_image1.png
   └── my-other-post_image2.jpg
As you accumulate more and more posts, the disorganized pile of images inside /static will continue to get larger and more unwieldy. I highly prefer the structure provided by the leaf bundle method, and I think you will too. Now, back to the business of creating your first post.
Creating a post (As a Leaf-Bundle!!)
Run the below command in the Hugo container CLI to create a test post on your site:
hugo new content/posts/*YOUR_POST_NAME*/index.md
If you wish, feel free to modify index.md to add a quick “hello world” message, or something of the like, but do not feel obligated. Your first post has been created, whether it has anything written in it or not. With that, time to generate your site!
Generating your Site
One last command to run now.
hugo
With that, your hugo site has been converted from a pile of markdown documents, images, themes, and the like (that only Hugo can understand) to an actual HTML website that can be displayed by any web browser. You’ll find the generated website inside the /public folder created at the root-level of your site’s repo.
This folder is what your web-server will be pushing out to the internet whenever someone accesses your website. Your web-server will only serve the HTML files that are in this folder, so any time you want to update your site, or add a new post, you will need to run the
hugocommand again to generate your site fresh.
Hosting your Site! (Locally)
Before setting up your newly generated site to be accessed over the internet, we’re going to preview it on your local network. Hugo includes a built-in web-host function for this exact purpose. To take advantage of this, run the below command (again, inside the Hugo Container’s CLI):
hugo server
With luck, you’ll be greeted by the following message:
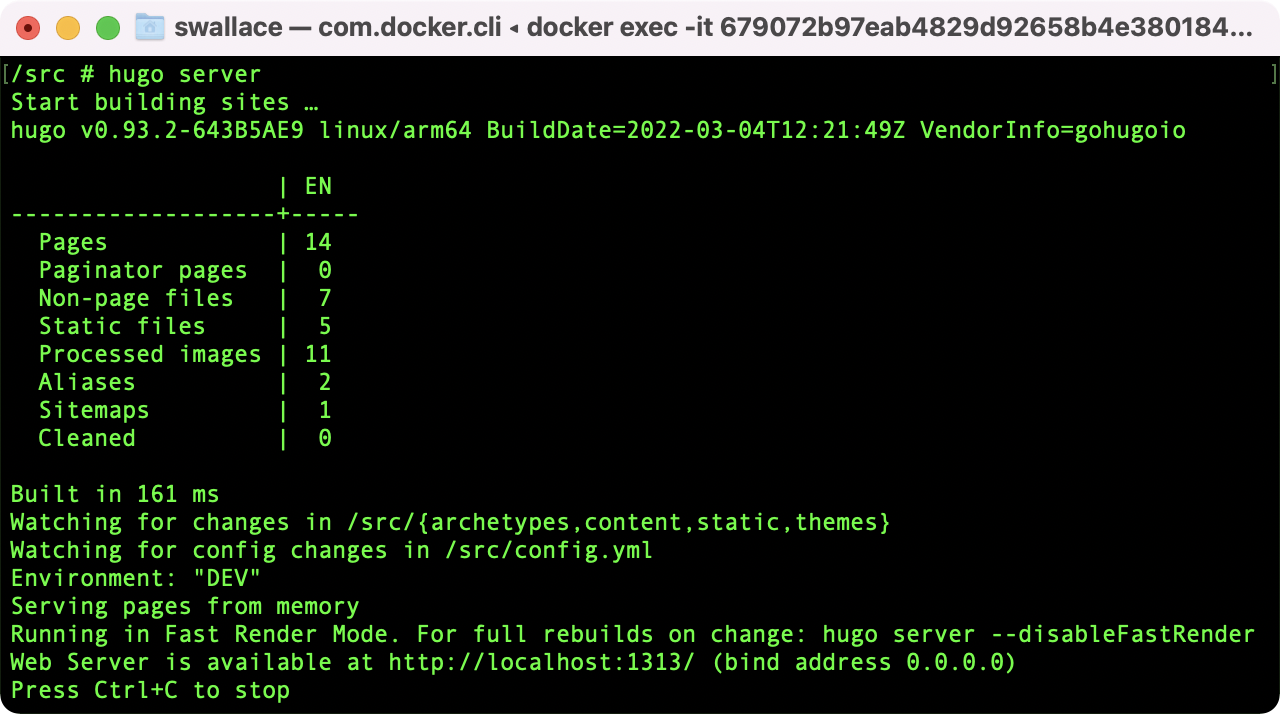
Open http://localhost:1313 in your browser of choice to view your site! As you may have noticed in the above image, the nice thing about previewing your site this way is that Hugo generates the preview in something called “Fast Render Mode.” Fast Render Mode means you don’t have to run the hugo command and regenerate your site every time you want to see a change displayed in your browser. Using the local preview, if you are editing a post, just save any changes you’ve made to the index.md file of a given post and you will see them immediately reflected in your browser. Live previewing!
If you were not so lucky, you may have gotten an error in your CLI session that says something like “Check your Hugo installation: you need the extended version to build…”. This is because some themes require an extended version of the Hugo docker image in order to build successfully. Remember earlier, when I said the Hugo image is highly configurable, has many tags, blah blah blah? Here you have a great illustration of that fact. If this happens to you, change line 3 of
docker-compose.ymlfromimage: klakegg/hugo:latesttoimage: klakegg/hugo:ext-alpine. Shut down your container, relaunch it usingdocker-compose up, and you should be good to go.
Phase Two - Hosting your Site on the Web!
Believe it or not, this should be the easy part. We’re going to spin up another container, this time for NGINX Proxy Manager (NPM). NPM (no, not that NPM… hopefully this is not too confusing) is an awesome web-based GUI built on top of stand-alone NGINX. It is generally used for securely exposing services running on your network to the internet. For example, if you wanted to securely access your Home Assistant Server over the internet, rather than strictly via your home network, or over VPN. In that scenario, you already have a web-server operating a given service or web-app locally, you are just using NPM as a reverse proxy to access that service over the internet. So how can NPM be used to host your site? With a little bit of tricky configuration, NPM can also be used to host static files to the web– which is exactly what Hugo static sites are!
Before setting up NPM, lets quickly configure DNS rules for your domain and add port forwarding rules to your router. Getting this done first prepares the way for traffic to be directed by your domain’s nameservers to your web-server running NPM.
Configuring your Domain and Router
Begin by logging into your domain registrar’s website, then pull up the page for managing your domain’s DNS records. For me, on Google Domains, it looks like this:
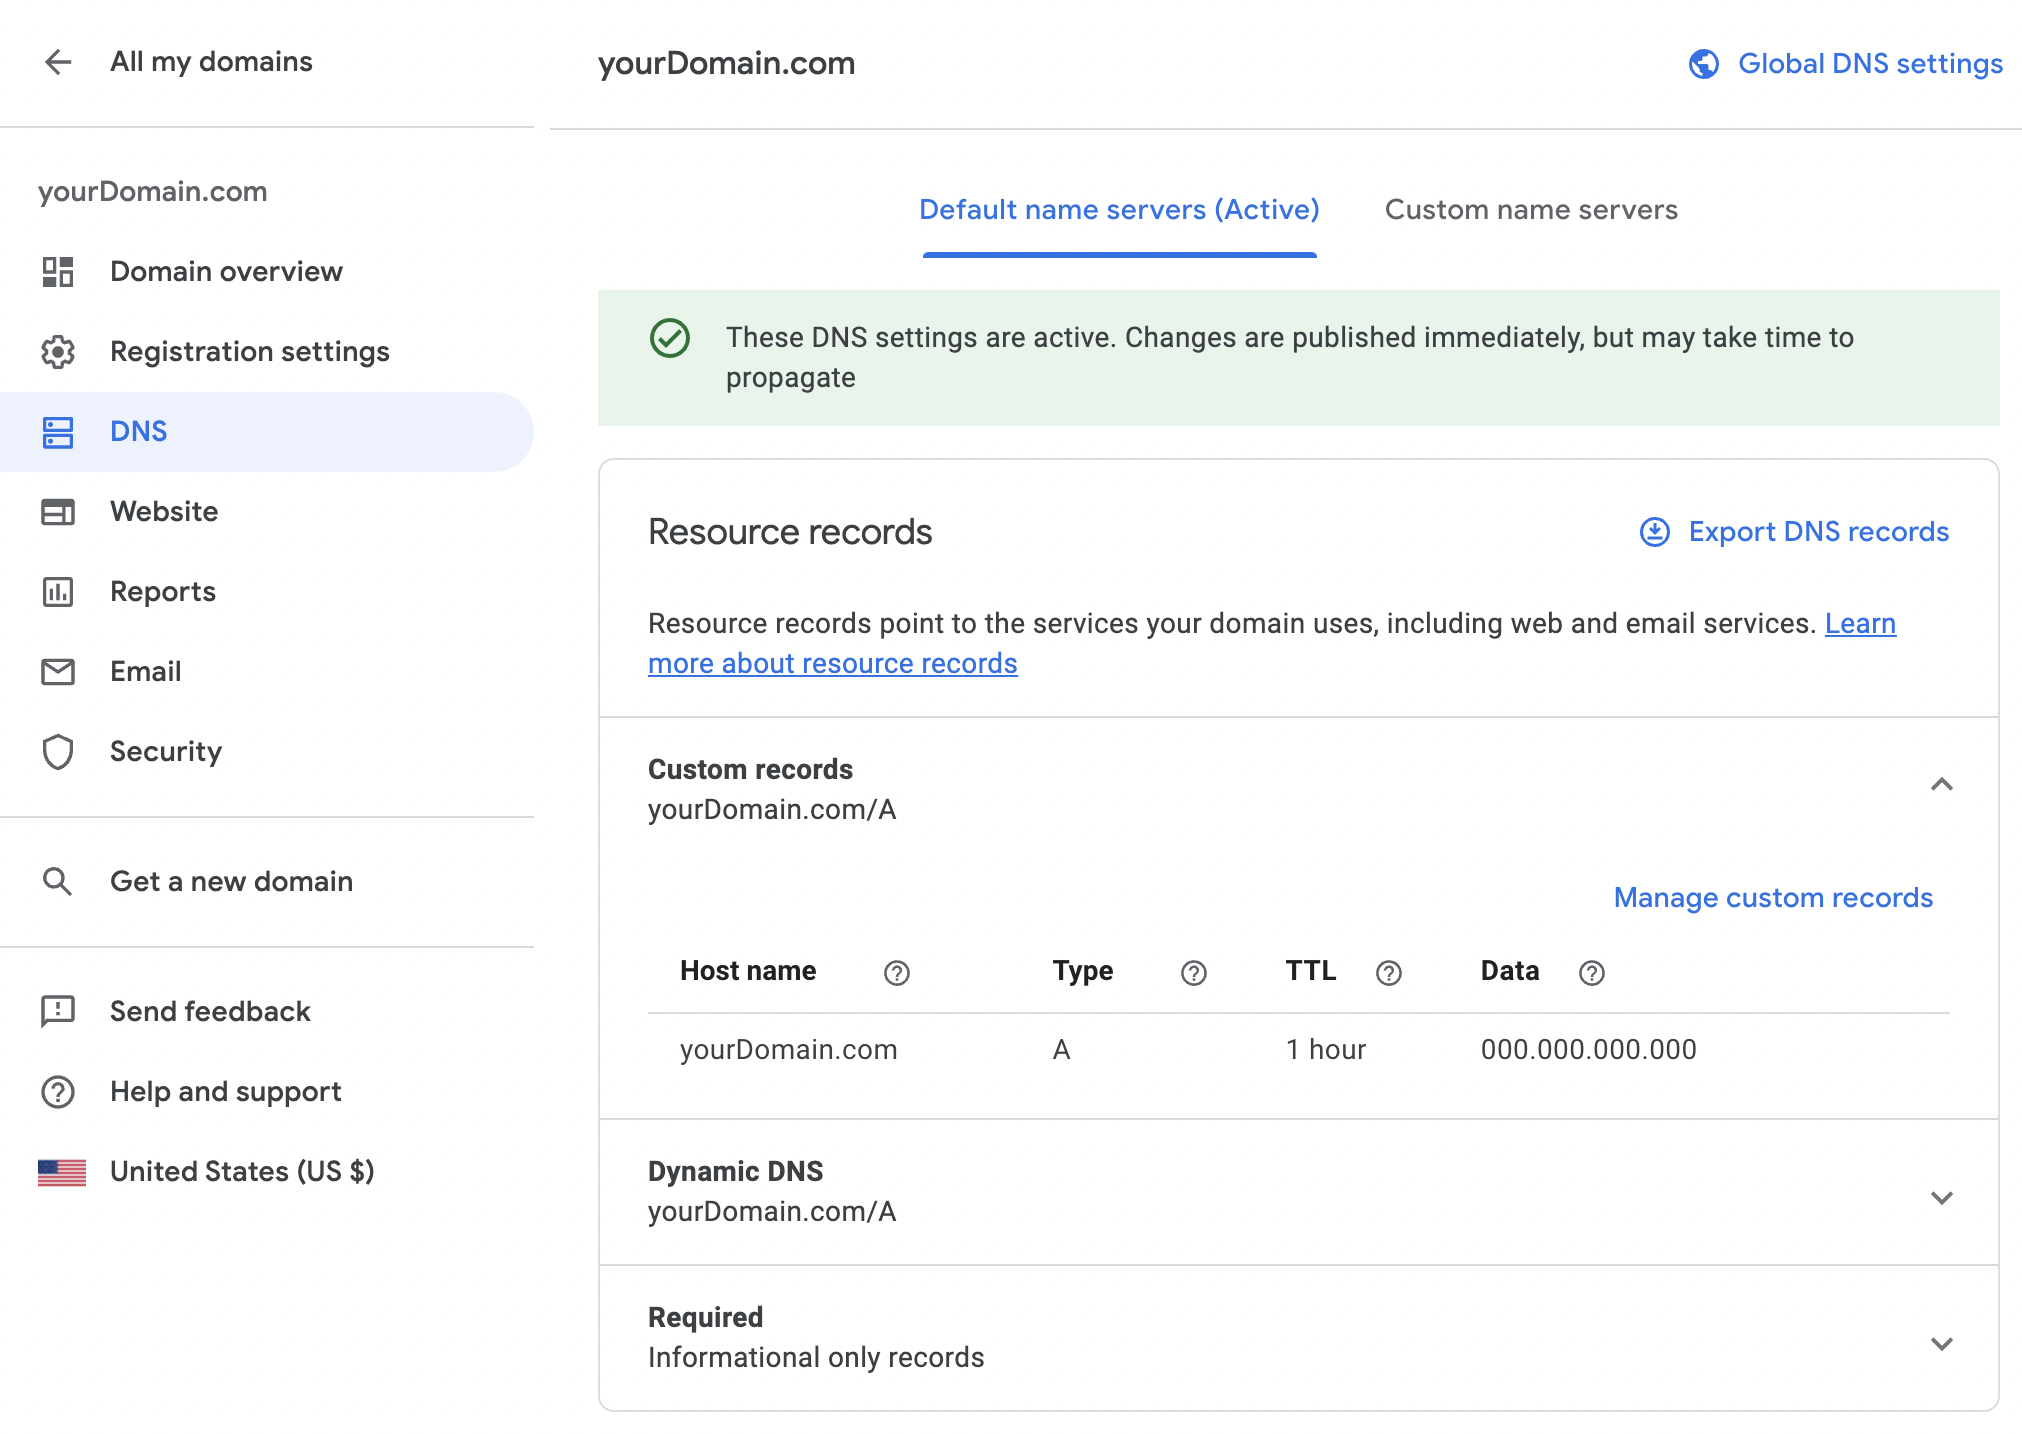
You will want to create a DNS A record resolving yourDomain.com to your public IP address. Ideally, this address will be static, but most home connections are not. With that in mind, I’d recommend configuring Dynamic DNS (DDNS) via Google Domains or Duck DNS, as earlier stated. Without DDNS in place, your site will go down any time the public IP on your home network changes (usually when you reboot your modem). With this DNS record in place, anytime someone accesses yourDomain.com, your domain registrar’s nameservers will resolve the request to your home network’s router/gateway.
With domain DNS rules in place, traffic to your domain will now be pointed to your router. How does your router know what to do with it? Well, you have to tell it what to do. Port-forwarding rules are used to tell your router what traffic to send where. To setup rules telling your router how to handle traffic for your website, you’ll begin by logging in to the management interface of your router/gateway. From there, you’ll navigate to the Port-Forwarding management page, and add a rule. Unfortunately, I cannot be much more specific than that, as the process will be different on every router. For me though, on a Ubiquiti UniFi based network, it looks like this:
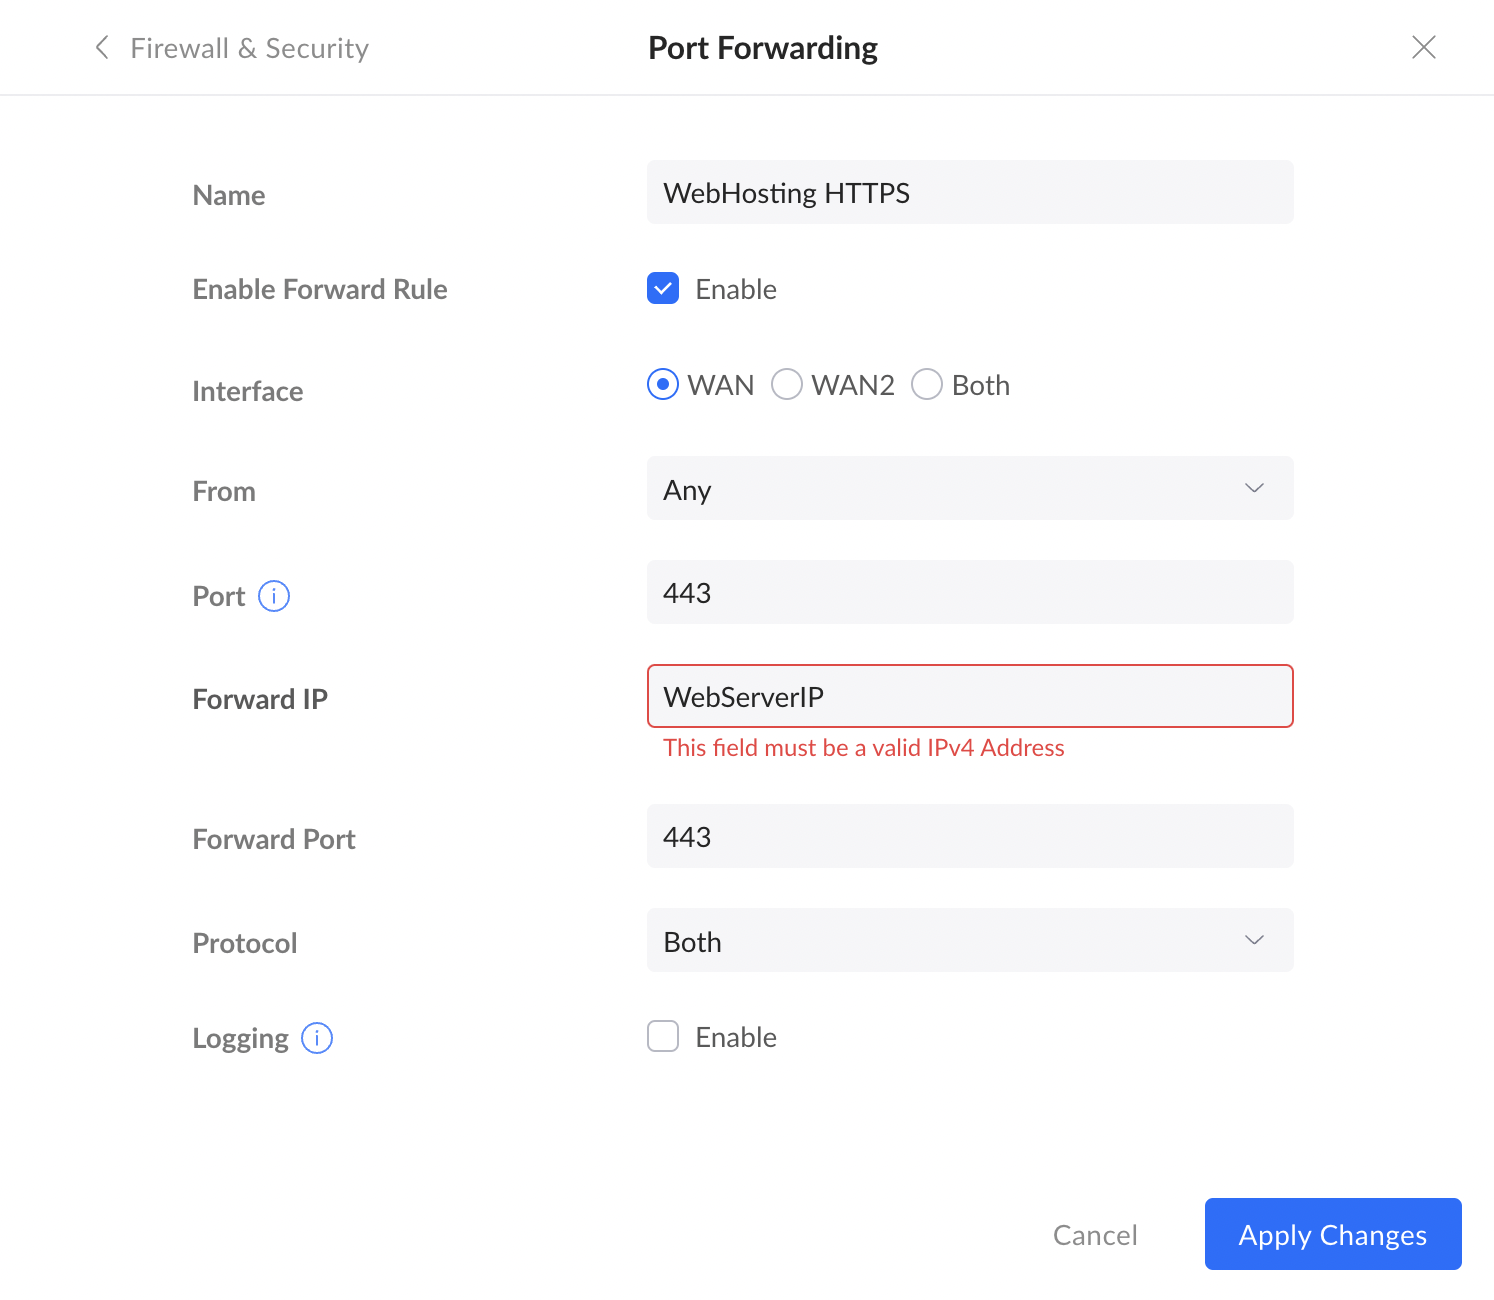
Make sure to set ‘Forward IP’ to the IP address of your web-server. Also, double check and make sure your web-server is setup with a static IP address while you’re at it. Don’t want that changing on you!
You’re going to need to create two rules here– one for HTTP traffic coming in over port 80, and another for HTTPS on port 443. You’re setting up these rules to point all HTTP and HTTPS traffic coming into your network to your webserver. With those rules in place, you should see something like this:

You only need to worry about the two rules for HTTP and HTTPS. The other pictured rules are just me censoring my network config.
With port forwarding complete, you’ve completed the chain such that all traffic going to your domain will reach your web-server, as demonstrated in this image:
Traffic mapping complete!
Setting up an NGINX Proxy Manager container
We’re nearing the end! Now that
- Your HTML site is sitting in the
publicfolder - Your router and domain DNS are configured to point HTTP and HTTPS traffic to your web-server
All thats left is to configure NGINX Proxy Manager to actually serve your website! To do that, use the below docker-compose.yml to create an NPM container on your host. Same drill as before, download the file, and you’ll need to make a couple edits before running.
First, you’ll need to chose where on your host system you would like NPM data and LetsEncrypt certificates to live. I recommend creating a folder named container_app_data at the root of your host, with sub-folder NPM. Do that, then just change *PATH* in lines 10 and 11 of docker-compose.yml to /container_app_data/NPM, and docker will automatically create sub-folders for Data and Lets Encrypt at /container_app_data/NPM/data and /container_app_data/NPM/letsencrypt respectively.
Lastly, you’ll need to change *PATH TO SITE* in line 12. Set this to be the same as whatever you chose for *PATH TO SITE* when creating the Hugo container. Giving NPM access to *PATH TO SITE*/public will allow it to access your generated site (inside the Hugo container’s public folder).
With these modifications in place, open a Terminal/Powershell session at the location of docker-compose.yml and run the command:
docker-compose up
If everything is setup correctly in docker-compose.yml, the container will build and you’ll see the following new container in Docker Desktop:
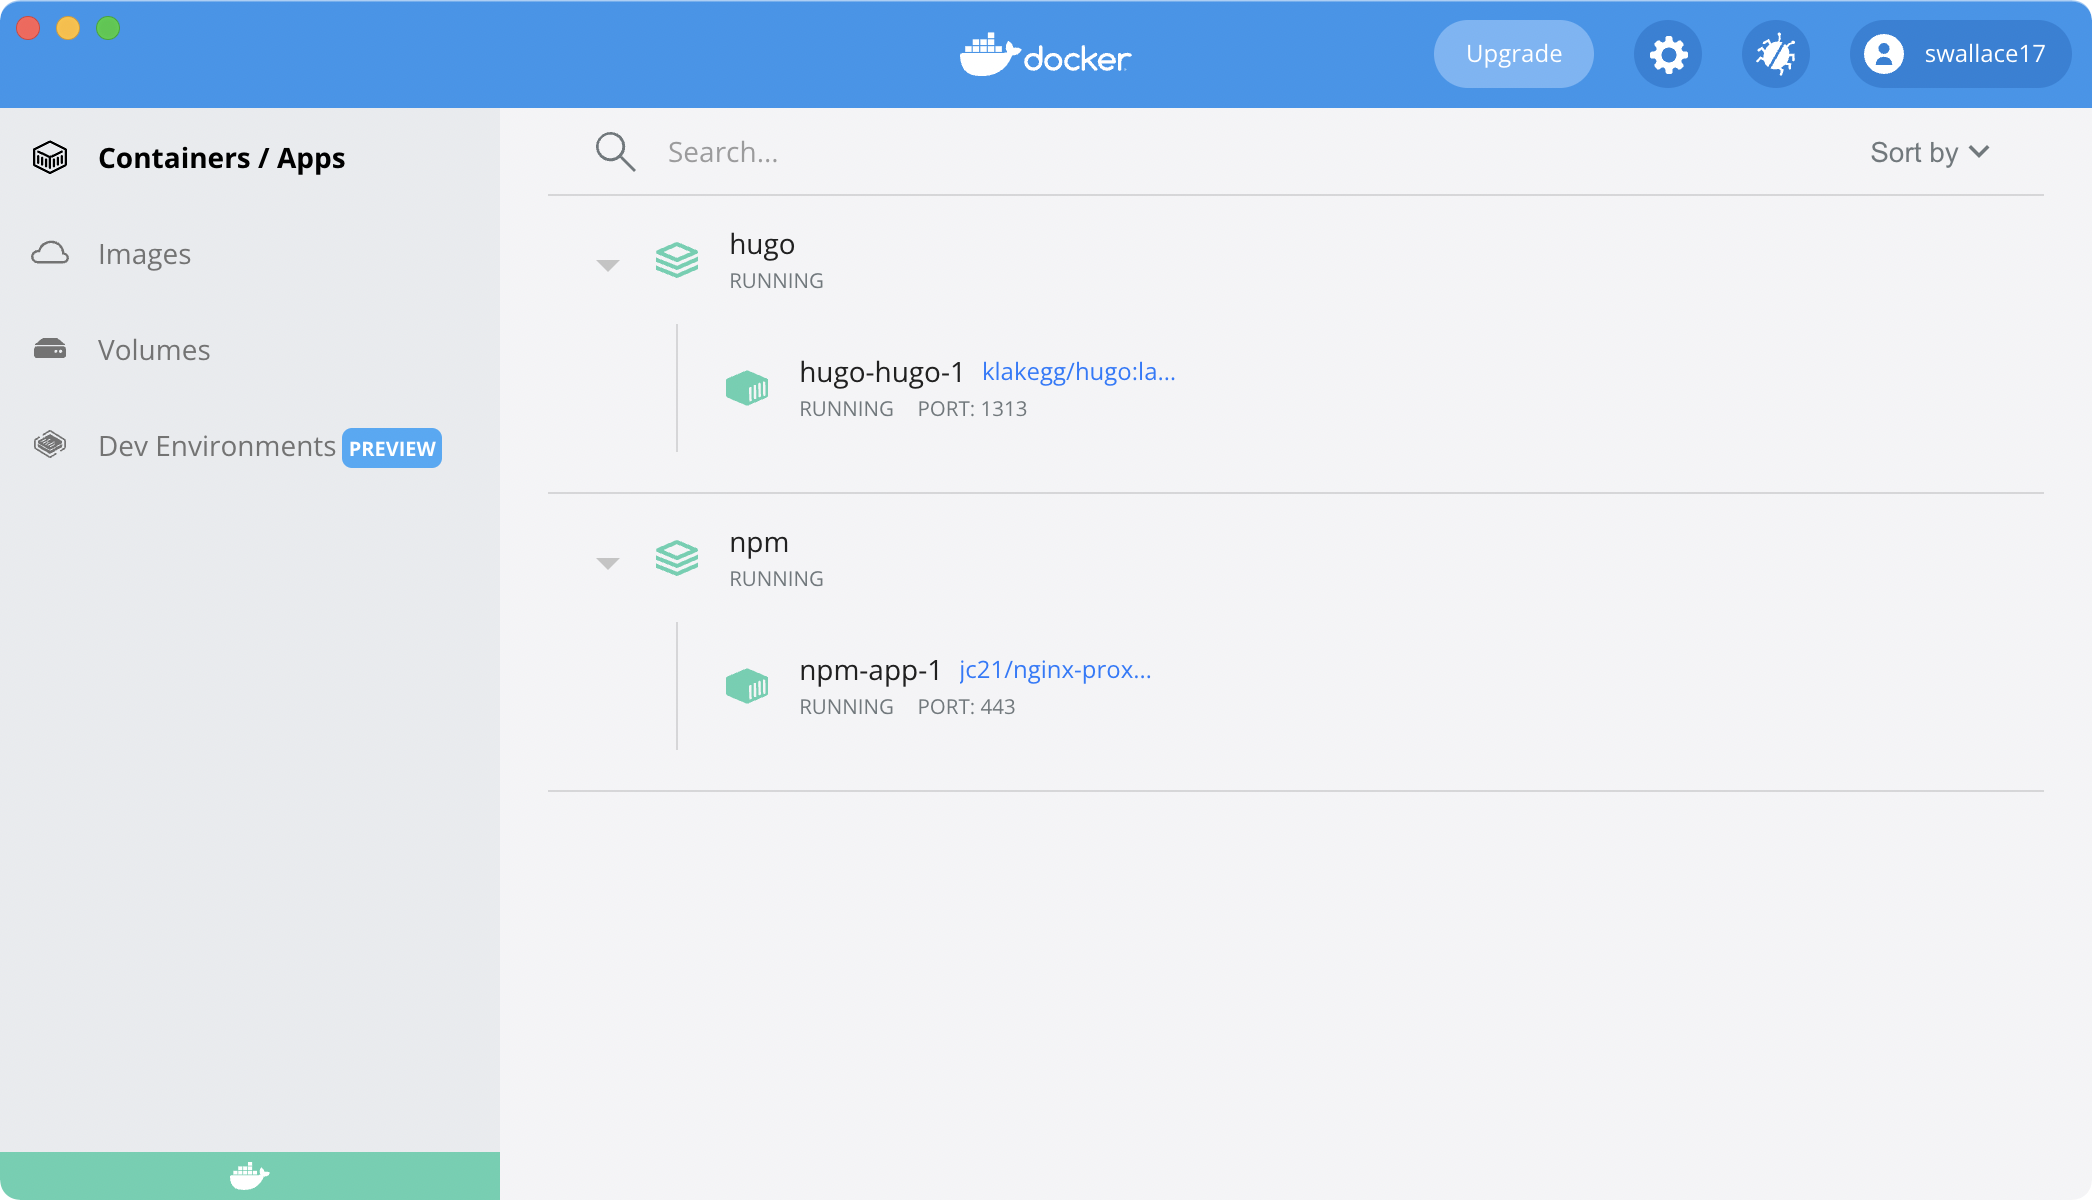
Two containers now!
Configuring NPM for Static-Site Hosting
With the NPM container running, open up a browser on your host machine and navigate to http://localhost:81. When you do, you should see the NPM login page:
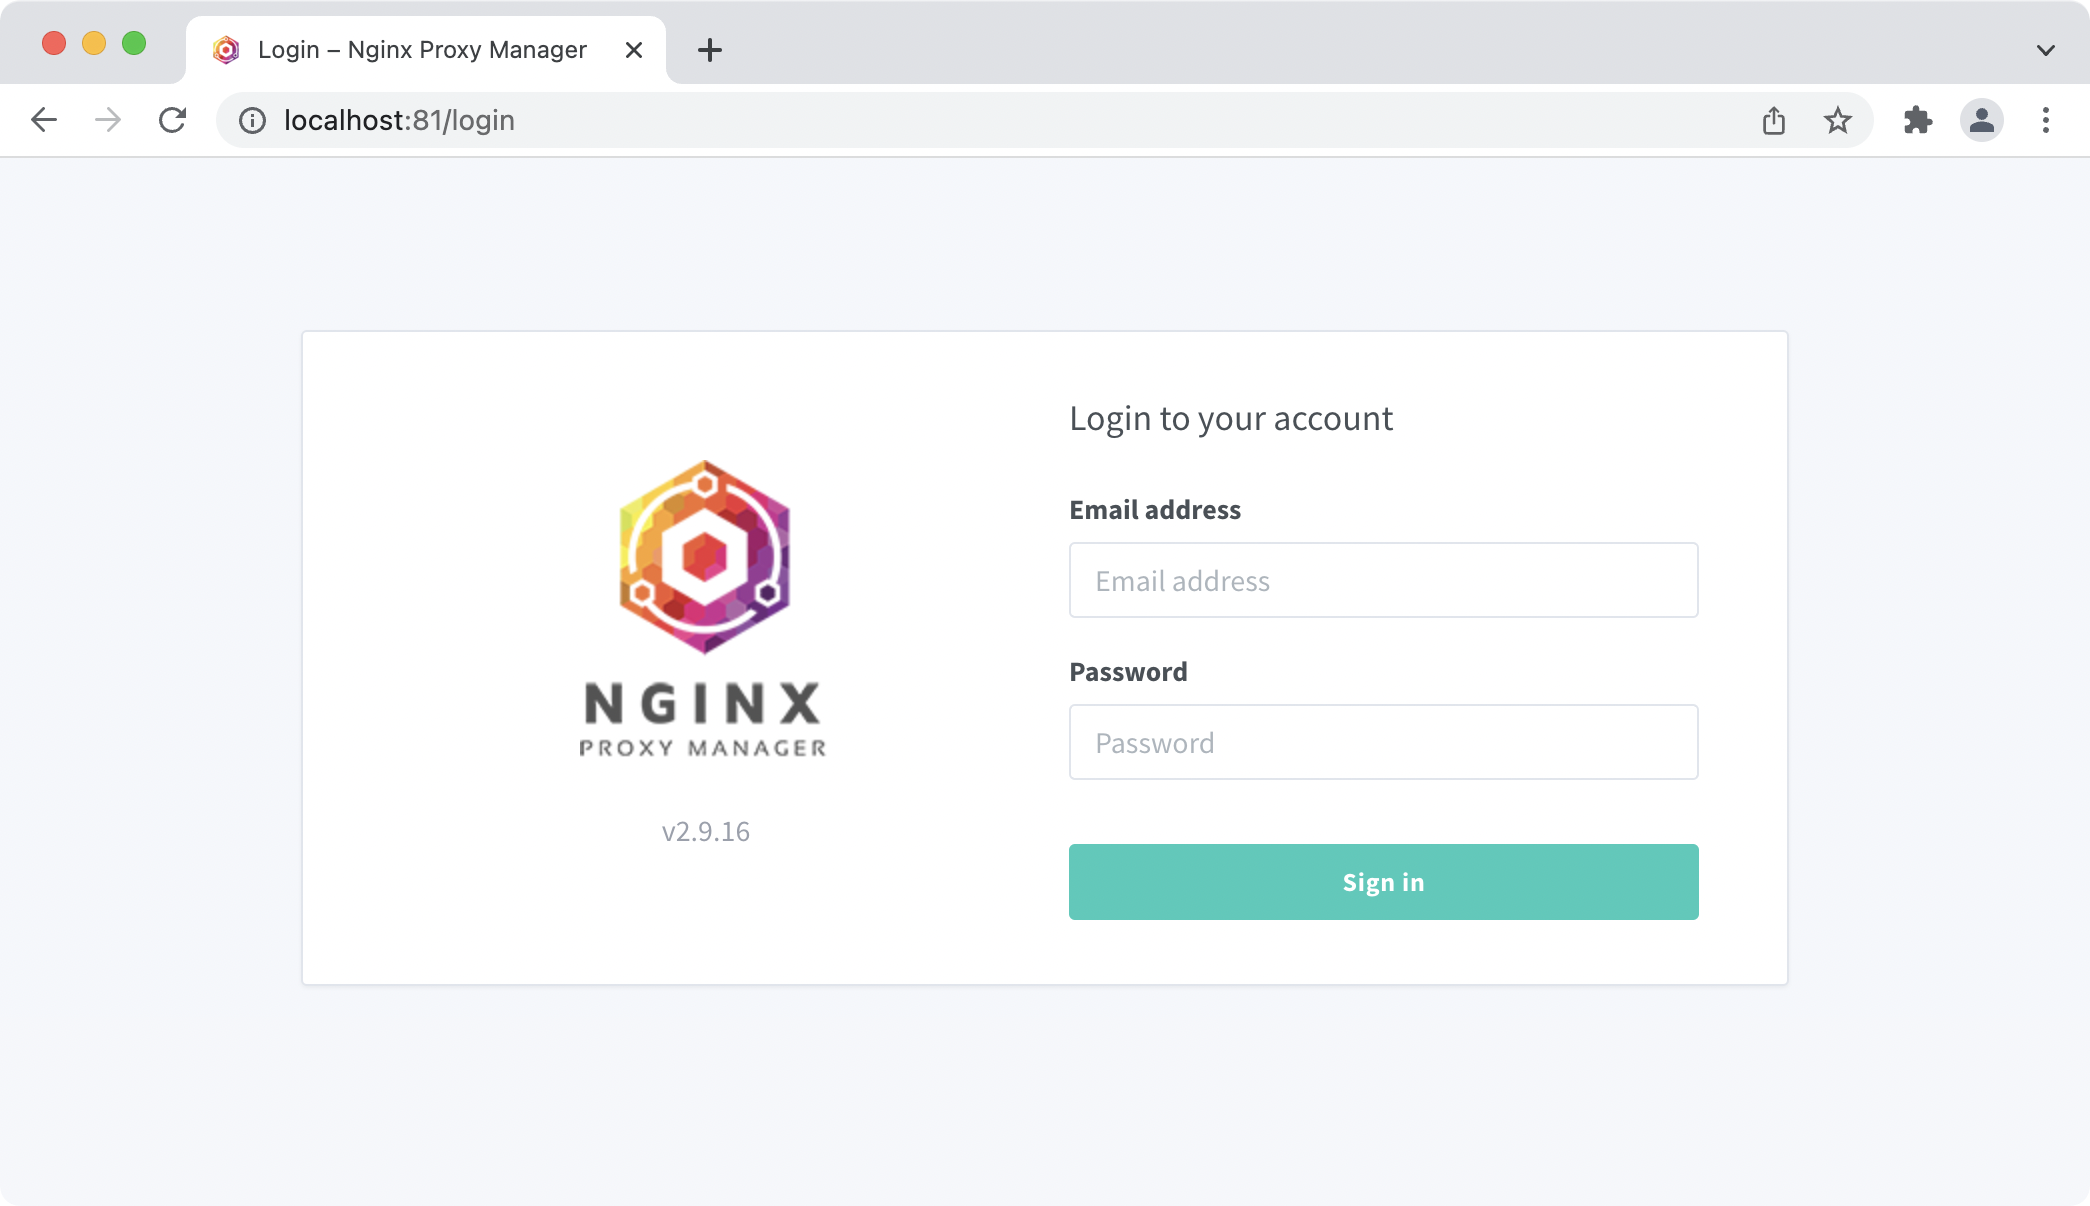
To login, use the default username and password:
Email:    [email protected]
Password: changeme
You will then be prompted to setup new login credentials. As with anything, make sure to setup a unique, strong password (I recommend 1Password to help with this). Once you’ve setup your new login, click on “SSL certificates” in the tab bar, then “Add SSL Certificate.” On this screen, type in your domain name, email and “I agree to the Let’s Encrypt Terms of Service”, like this:
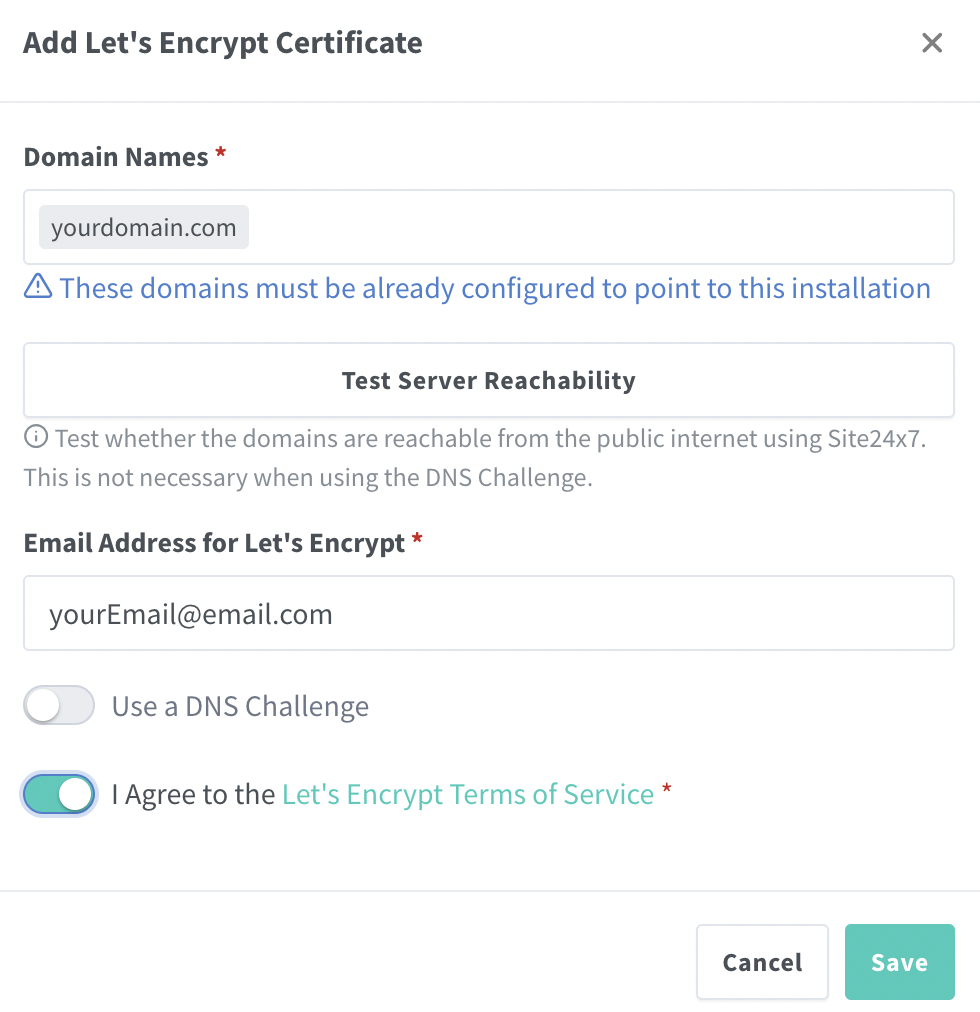
Before clicking save, make sure to click the “Text Server Reachability” button. You should see the following message if successful:

Success here demonstrates traffic from the internet is reaching your web server correctly. Congratulations! You must have setup your domain DNS records and port-forwarding rules successfully. If you don’t get a success message here, you might need to go back and double-check those steps. Click the save button, and your SSL certificate will be added:

With your SSL certificate created, all thats left is to configure a Proxy Host, and your site is live! Click the Hosts tab, then Proxy Hosts. On the Proxy Hosts page, click the Add Proxy Host button. The “New Proxy Host” screen will pop up. Beginning on the details tab, configure your proxy host like this:
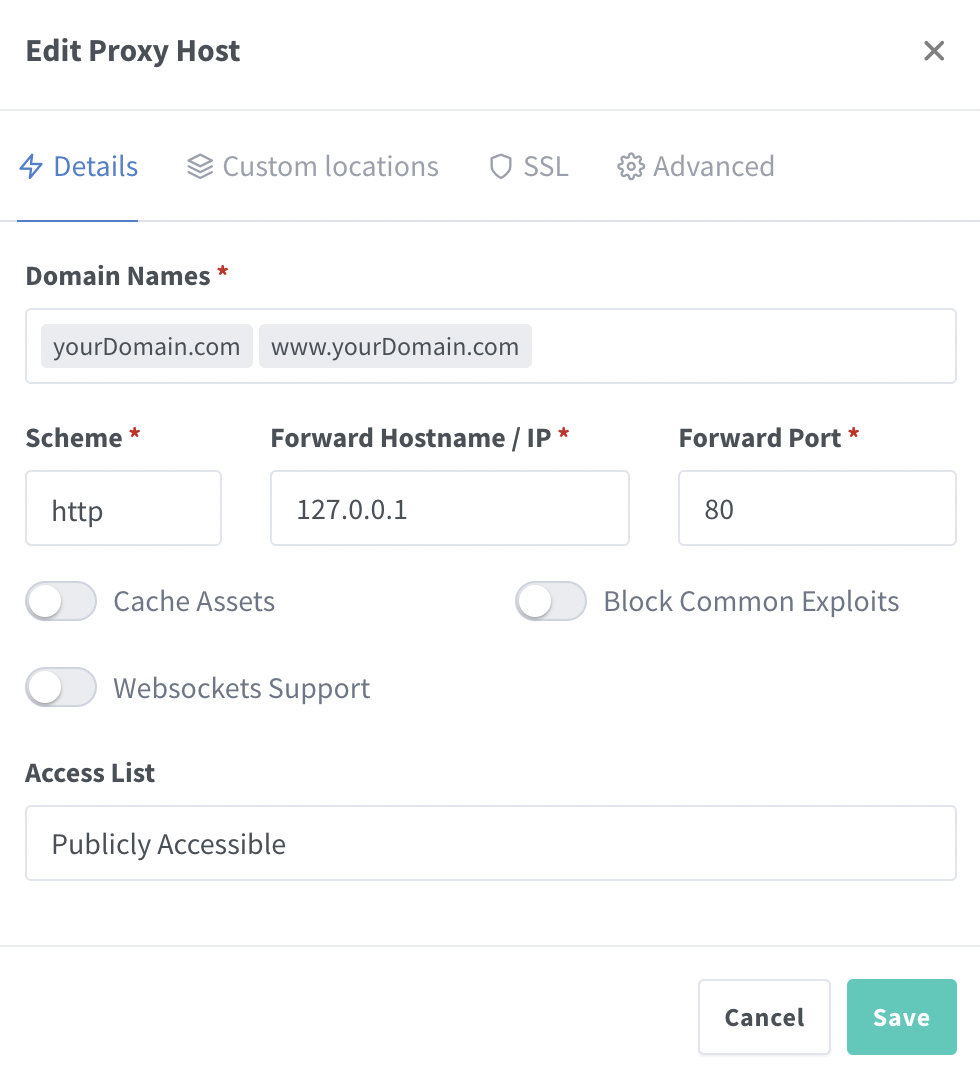
Obviously be sure to use your actual domain name, not yourDomain.com and www.yourDomain.com
Then click on the SSL tab and select the SSL cert you just created, like this:
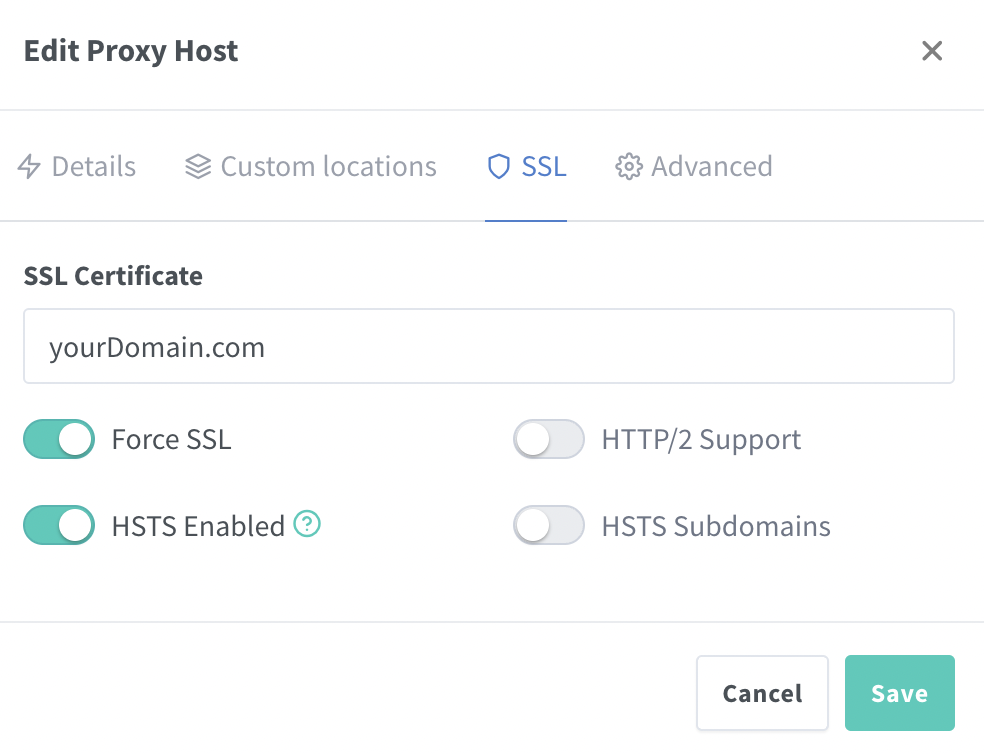
Make sure ‘Force SSL’ and ‘HSTS Enabled’ are both turned on
Lastly, click the Advanced tab, and paste the below as Custom Nginx Configuration.
location / {
  root /site/;
}
like this:

This is the ’tricky configuration’ I mentioned earlier. Thanks to Burke Azbill writing on DimensionQuest.net for figuring this out!
This little bit of custom configuration is having NGINX host the static content contained inside the NPM container’s /site folder. That folder just so happens to contain your website, as, when you modified the docker-compose.yml for the NPM container, you mapped it to the same location as the public folder your website was generated in. Save this config, and your website should be live! Open up a browser, navigate to your domain name, and there it will be! With your site created, all you have to do now is fill it with content. Congratulations!
Phase Three - Wrapping Up
Lets wrap up by connecting your site up to a Github repo, and discussing some things you can do to enable some general quality-of-life improvements as you manage and continue to develop your site.
Connecting to GitHub
When you first used Hugo to create your site, it initialized your site template inside a git repository. All you need to do now is add this existing repository to GitHub. There are many ways to accomplish this, and this tutorial has gone on long enough, so I won’t be verbosely outlining a specific one. In general though, you just need a git client that integrates with Github. Github Desktop works great on Windows and macOS, and there are unofficial forks that run on Linux. If you hate yourself, you can do it exclusively using git in the command-line (I’m mostly joking- but if you’re working with git exclusively via CLI, you probably don’t need to be reading this). You could also do it with tools like Tower, or GitKraken, both premium GUI git clients requiring for-pay licenses.
Personally, I enjoy using the source-control integrations built directly into text editors like Atom or Visual Studio Code. With these tools, I can write posts, modify site configuration files, and push up to Github all in one program. Makes it all quite easy.
Ultimately, all you need to do is add your existing local git repo to Github. Pick your favorite way, or try a couple!
Quality of Life
This may sound counterintuitive, but I would recommend setting up an additional development environment on your everyday desktop and/or laptop if you have them. Working directly on the web-server is likely a bit incontinent, if you’ve truly set it up to act as a server. Most of the time, my server runs completely headless, with no monitor, keyboard, or mouse attached, but it is running my site’s docker containers all the same. Day to day, I do most of my site’s development from my laptop. How does that work? This is the benefit of having a site running on docker containers and a Github repository.
On my laptop, I’ve installed Visual Studio Code, and used it to clone my site’s GitHub repo locally. From there, I’m able to edit my site as I please. I also have Docker Desktop installed on my laptop, running Hugo inside a container, as we discussed earlier. If I want to preview any changes I’ve made, I just start up the Hugo server inside the container, and preview my changes from http://localhost:1313. I usually have the local Hugo server running as I write so that any time I want to check my work, I can quickly save the post I’m writing, switch windows, double check how the site will look, and switch back to resume my writing. Whenever I am done with a post and ready to publish, I save my work and run the hugo command inside my local docker container to generate my site fresh inside the public folder. From there, I initiate a git push to sync my changes to GitHub, and remotely initiate a git pull on my web server to sync the changes back down from Github. Boom, changes are live on the web!
You can do this on as many computers as you like, enabling truly mobile site development. If you can live without running Hugo locally for previewing, you can even publish to your site from an iPad or smartphone. All you need is a git client. If you want to get really fancy, you can even add another docker container to your web-server called Code-Server. This container enables you to run Visual Studio Code inside a docker container, and interact with it through a web-page. Then you effectively have a full development environment running inside docker containers on your web-server, which can all be remotely accessed over your network.
Long story short, you have no shortage of options when it comes to convenient ways to manage your site. Figure out which setup is most beneficial to your use-case, and you can make it happen pretty easily.
With that, our tale has been told. If you followed along, you should now have a site live on the internet, and many tools at your disposal to manage it. As you begin to create content for your site, you may find it helpful to see additional commands you can run with Hugo, what type of markdown is supported by Hugo as you write posts, and shortcodes Hugo supports for special formatting on top of markdown. Lastly, don’t forget to read your theme’s documentation for special functionality it may provide to your site (many themes have custom shortcodes for adding additional formatting possibilities to your site, beyond basic markdown and Hugo’s built in shortcodes). Thank you for reading, and good luck to you, as the real work has only just begun- time to get writing!