
I was originally going to title this post “Optimizing the Circadian Lighting Home Assistant Integration for use with Phillips Hue.” Thats the core of what the below is all about, but I eventually reconsidered, thinking it sounded a bit too much like jargon soup. So, before getting too into the weeds, lets begin by talking generally about smart lighting in the home.
In my ongoing journey to create an ever more integrated smart-home, I have opted to utilize the Phillips Hue platform for my lighting. Generally speaking, I recommend against using smart bulbs, in favor of smart switches from Lutron’s Caseta platform. In my home though, I go against my own advice. I do so because of how much I value the dynamic color, and color temperature functions offered by the Hue ecosystem. Yes, the bulbs are expensive, and their fixtures and other accessories generally even more so. You also run into the issue of having to keep your physical light switches always toggled on. The smart bulbs, after all, effectively have tiny little computers inside them that need constant power to function. Hue has a $40 product which removes that irritation, but of course, that requires spending even more money on this ecosystem, in addition to popping open switch boxes and doing some rewiring. You really gotta commit– and I have– but take that as a cautionary tale. If you can live without dynamic color and color temperature, smart switches are really the way to go.
And its worth repeating- if you want smart switches, don’t waste your time on anything other than Lutron’s Caseta line). No sponsorships here, its just a solid product.
Cautionary tale out of the way, if you have also chosen to use Hue for your lighting, you may have found yourself wishing that you could set your lights to automatically adjust their color temperature throughout the day. Warmer tones at night, and cooler ones during the day, for example. Its an increasingly popular concept. In a perfect world, what I would like is for lights to be cool and bright during the day, slowly transition to warmer with the movement of the sun across the horizon, and gradually become a bit dimmer as the night draws on. Doesn’t seem too difficult, right? To me, this seems like The Natural Purpose of Smart Lighting.
“Time-Based Light” Hue Formula
For years, Phillips has offered a basic version of this functionality through the Time-Based light formula (formerly “Feel Better With Light”) in the “My Labs” portion of the Hue app. This functionality is a bit limited though. All it really does is switch through a few pre-determined scenes at specified times of day. It actually works really well. It’s reliable, is quite simple to setup, and runs entirely on the Hue Bridge, no additional hardware or software integrations needed.
For any “normal person”, this would “fulfill smart lighting’s natural purpose” just fine. In fact, this is the solution I generally recommend for anyone who wants automatically adjusting color temperature in their lights. I’ve actually set it up for my parents, with a Hue starter set I gifted them after they completed a minor remodel of their bedroom a few years back. Far as I know, they’ve never had an issue, and really enjoy the “daylight bulbs” during the day, and “warm bulbs” after 6pm or so. In an effort to make my own life as difficult as possible, however, I can’t be content with this for myself. What I want is a smooth transition from cool to warm as the day goes on, not single trigger point where we switch from “cool mode” to “warm mode.” So what else is there to consider?
Apple’s “Adaptive Lighting”
Apple, with iOS 14 at WWDC 2020, announced a HomeKit feature called Adaptive Lighting. Initially, it seemed like this feature was going to be great. My ongoing to-do item of “fulfilling smart lighting’s natural purpose”? Check! Or so I had hoped. In typical Apple fashion, the feature launched with basic functionality and little to no customization options– and the basic functionality it does have? Well, it doesn’t make much sense to me. Apple’s Adaptive Lighting works with Hue lights through the Homekit platform. During the brief time I tested it, it seemed to work well and reliably. But what does it actually do? With Adaptive Lighting, color temperature changes are inherently tied to changes in brightness. Basically, if you turn the brightness down, the light becomes warmer. If you make a light bright, the color temperature of the light becomes cooler. I’m sure this is functionality that someone wants, but it makes no sense to me. Moving on.
Circadian Lighting
Since 2019, the only method I have found that even comes close to meeting my needs is a Home Assistant integration called Circadian Lighting. It’s awesome, but boy does it ever up the complexity level. To use it, you’ll need a hardware server capable of running Home Assistant. This can be as simple as a raspberry pi, or you can run it as a docker container on whatever host you like.
If you are not familiar with Home Assistant, and you have a vested interest in home automation, you’ll want to get familiar. In short, it ties together all the various home automation platforms from Apple, Google, Amazon, etc, and lets them all coexist and integrate together under one roof. There’s a learning curve, but the payoff is worth it, and if you’re reading this to begin with, its likely right up your alley.
Circadian lighting does it all, and it very customizable to boot. It ties in to the Home Assistant platform, and allows me to fully “fulfill my smart lighting’s natural purpose”. I first started using it in 2019, a week or so after I moved into my first apartment, configuring it at 2am the night before my wedding. Good times! I’ve been using Circadian Lighting ever since, and haven’t found anything better.
The only thing that has even gotten close is an extremely similar integration called Adaptive Lighting. It has a few extra features, but nothing that impacts my usage. I believe it started as a fork of Circadian Lighting, and both are actively maintained. I’d recommend checking out both, and seeing what will best fit your needs, but for now I’m still using Circadian Lighting.
Circadian Lighting’s Only Hiccup
I’ve only had one hiccup with Circadian Lighting, and solving it is what this post is all about. Circadian Lighting smoothly transitions the color temperature of lights throughout the day, just like I want. However, it only smoothly adjust the temperature of lights which are turned on. What happens if I turn a light off at noon, and flip it back on at 9pm? That light will very briefly turn on to “daylight mode” (however it was configured at noon, when it was last on). Then, the Home Assistant server will see that the light has been toggled on, and Circadian lighting will kick in and adjust it to the “correct” setting for whatever time of day it is. The whole process takes only a couple of seconds at most. Far from the end of the world. But look, you’re reading a 3000 word freakin’ essay about my light bulbs- of course this began to grate on me. I had come so far! Anything but lighting perfection was unacceptable.
The Fork Solution
In October of 2019, my brother-in-law Robert and I worked out a solution in this Github issue on the topic, along with another user, Bluefries. It was an exciting moment when we got it working, late one night. Basically, what we did is configure Circadian Lighting to dynamically update a Hue Scene every time it updated the color temperature value for lights throughout the day. We then programmed our Hue Light switches to turn lights on to this scene whenever the button was pressed, and problem solved! The lights would instantly turn on to the correct setting, no delay.
Long story short though, the modification involved changing some code in Circadian Lighting. We spoke with the developer about submitting a pull request, but they wanted to solve this problem in a different way (for reasons that make sense, but are beyond the scope of this discussion). So a pull request was never submitted. Over time, updates to Circadian lighting would break the modification, and we’d have to work out a fix. Eventually, we resorted to simply running an old version of Circadian Lighting to maintain compatibility with our modification.
Robert forked the project, and I believe still has the modification working, but I’d ideally like to solve this issue without having to maintain an ongoing fork of the project.
Automation Solution
This is where the Home Assistant platform becomes very helpful. In short, I’ve managed to write a Home Assistant automation which solves this issue by utilizing both the Circadian Lighting custom integration and the Hue integration, without modifying either of them. I believe this solution is closer to what Circadian Lighting’s developer originally wanted to implement and document, but never got around to.
So, lets talk about the automation. To start, the automation is triggered by a light switch being toggled. Then calculates a color temperature and brightness value based data provided by the home assistant sensor entity created by the Circadian Lighting integration. It then finishes by setting Home Assistant Light Entities (provided by the Phillips Hue integration) to the calculated color temperature and brightness. All of this happens outside of the Circadian Lighting integration itself, so it should work regardless of future updates, etc.
Generally speaking, this approach works great, and I’m proud of what I feel is a pretty clever solution. I think its cool that an automation can work with two independently developed Home Assistant Integrations to bridge a functionality gap between them. That being said, there are downsides to this approach. Namely, some occasional significant latency. When I flip on a light switch configured with this integration, the lights generally switch on instantly. Every once in awhile though, I’ll have to flip it a second time for the integration to trigger. Or, if you flip back and forth quickly, it can become overloaded, and you’ll have to pause a moment before flipping the switch again for it to work properly. Mostly minor annoyances, but suffice it to say, not the level of reliability I would prefer. Also, because the light switches are toggling a Home Assistant automation– well, if your Home Assistant server is offline, for any reason, now your light switches don’t work. Thats… not ideal. I’ve accepted those issues for now though. The latency is rare, and my Home Assistant server has near 100% uptime. So, lets get into the solution.
Automation Examples
The automation code will differ slightly depending on what type of Hue Switch you are using. I have created examples for the Hue Dimmer Switch, the Hue In-Wall Module, and the Lutron Aurora “Friends of Hue” switch. Other switches should be simple enough to add support for with a bit of tweaking. Lets start with the Hue Dimmer.
#Automatically turn Lights ON to CL setting when designated Hue Dimmer button is pressed
- alias: HueCL - *Room* Switch - ON
  description: HueCL for *Room* Lights
  mode: single
  trigger:
    - device_id: *DeviceID* #(device_id can be found in the URL of a given device when pulled up in HA Web UI)
      domain: hue
      platform: device
      type: initial_press
      subtype: 1 #Hue dimmer switch buttons, 1-4, top to bottom
  action:
    service: light.turn_on
    data_template:
      entity_id: light.room
      kelvin: "{{ state_attr('sensor.circadian_values', 'colortemp') | int }}"
      brightness_pct: '{{ state_attr(''switch.circadian_lighting_circadian_lighting'', ''brightness'') | int }}'
This automation is intended to run when you press the “On” button on a given Hue Dimmer switch. I’ve tried to comment things as best I can inline in the YAML, but lets discuss a bit. First off, the alias and description lines can be customized to whatever you like for labeling purposes. Next up, things that actually need to be changed in order to use this automation successfully. First off, underneath the trigger: line, the *DeviceID* tag needs to be swapped out with an actual device ID as listed in Home Assistant. To determine this device ID, open up your Home Assistant web interface. Navigate to Settings–>Devices and Services–>Devices. Click on the switch you’re looking to automate, and the DeviceID will a long string of characters at the end of that page’s URL, as seen in the image below.
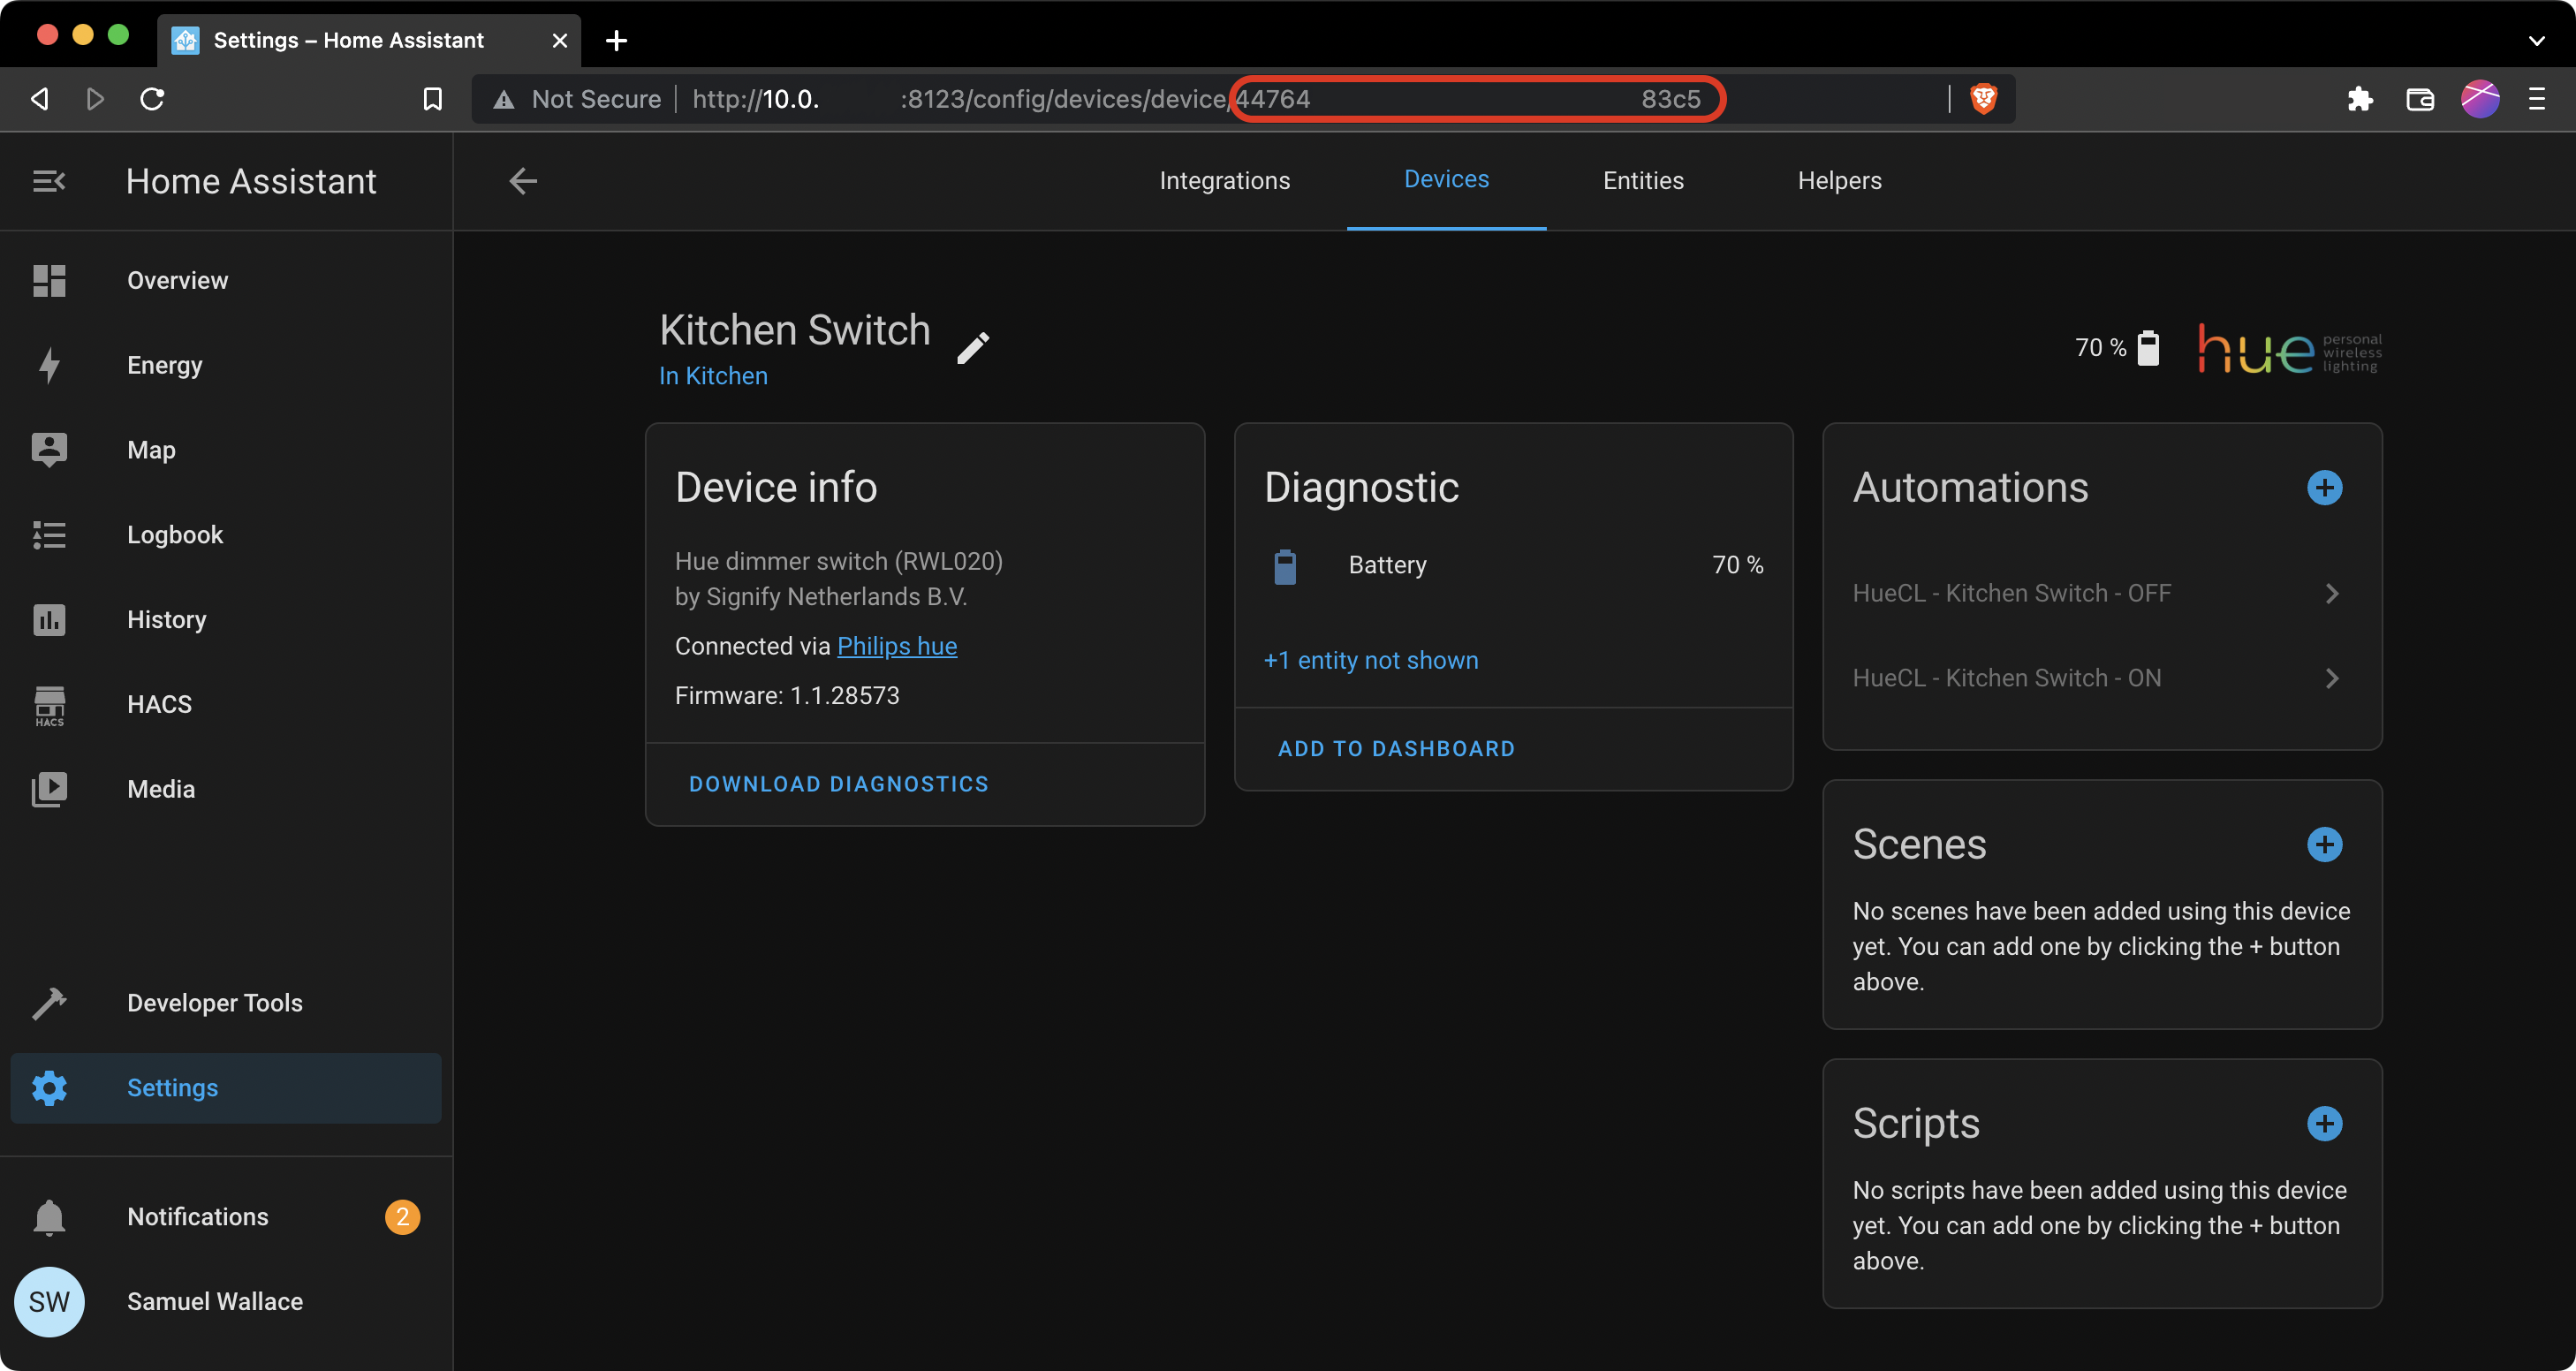
Device ID can be found circled in red, in the URL bar
From there, you may want to change the subtype: line. This is where you choose which button on the Hue dimmer you are using to trigger the automation. They are numbered 1-4, top to bottom. You will probably want to leave this on 1, using the top switch to turn on the lights.
Only two more things that will need changing. The first is entity_id. The Hue Home Assistant integration creates an entity for every room with lights in it. To find the entity ID of a given room’s lights, navigate to Settings–>Devices and Services–>Entities. Find the entity which corresponds to your room’s lights, click on it, and the entity ID will be listed. It should be in the rough format I listed in the code above. Lastly, in the brightness_pct: line, you will see the switch.circadian_lighting_circadian_lighting string. This is the entity ID of the switch created by the Circadian Lighting custom integration. Pull up your list of entities again, and search for Circadian Lighting. You should see the switch there, and be able to verify its entity ID.
With those changes made, you should be good to go. All thats left now is to setup the automation for the off button now as well– see below:
#Turn Lights OFF when designated Hue Dimmer button is pressed
- alias: HueCL - *Room* Switch - OFF
  description: HueCL for *Room* Lights
  mode: single
  trigger:
    - device_id: *DeviceID* #(device_id can be found in the URL of a given device when pulled up in HA Web UI)
      domain: hue
      platform: device
      type: initial_press
      subtype: 4 #Hue dimmer switch buttons, 1-4, top to bottom
  action:
    service: light.turn_off
    data_template:
      entity_id: light.room
Make changes here the same way as those above, and you’ve got a dimmer switch setup. Rinse and repeat for other Dimmer switches. But what if you have a switch without multiple buttons? For example, the Hue In-Wall switch, or the Lutron Aurora? These switches only have a single button which is used to toggle the lights on/off with each press. They can be used with a single automation that incorporates a bit of if/else logic for the toggle functions. See below:
#Automatically turn Lights ON to CL setting when Toggle button is pressed (if lights are currently off), or turn lights off (if they are currently on)
- alias: HueCL - Room Toggle
  trigger:
    - device_id: *DeviceID* #(device_id can be found in the URL of a given device when pulled up in HA Web UI)
      domain: hue
      platform: device
      type: initial_press
      subtype: 1 #Toggle button (Only one button)
  mode: single
  action:
    - choose:
        #Check if lights are off
        - conditions:
            - condition: state
              entity_id: light.room
              state: "off"
          sequence:
            - service: light.turn_on
              data_template:
                entity_id: light.room
                kelvin: "{{ state_attr('sensor.circadian_values', 'colortemp') | int }}"
                brightness_pct: '{{ state_attr(''switch.circadian_lighting_circadian_lighting'', ''brightness'') | int }}'
        #Check if lights are on
        - conditions:
            - condition: state
              entity_id: light.room
              state: "on"
          sequence:
            - service: light.turn_off
              data_template:
                entity_id: light.room
Just like before, you’ll need to setup DeviceID, entity_id, and circadian lighting switch entity ID. With those values swapped in, the automation should be functioning.
That about covers it! These automation have been key for me in eliminating lingering irritations with my smart lighting setup. Now I can use Circadian Lighting to fully realize what I’ve been referring to as “Smart Lightings Natural Purpose.” And, whenever I use a light switch to turn my lights on, they immediately switch on the the “correct” value as determined by Circadian Lighting. No delay! I hope these automations prove useful to you, either for a full solution, or as a starting point to something more complex.
Future Changes
Earlier, I mentioned that latency is a downside to this approach. I wanted to take the time to document where this issue comes from. Consider the flow of data that has to happen for a light switch to turn on:

Quite the process to get through every time you turn on a light
If its not readily apparent- thats quite the communication chain required to turn on a light. I mentioned this earlier, but to again elaborate:
Using this automation, usually my lights turn on/off near immediately, but occasionally there is a bit of a delay– maybe up to a second or two. Irritating. It also sometimes fails outright, and I’ll have to toggle the switch a second time. Lastly, if you toggle the switch back and forth quickly, it can get overloaded, and you’ll have to wait a few seconds, then flip the switch again for changes to be made.
With that long communication chain in mind, lets consider the original solution Robert and I worked on together, which he still maintains. While irritating to actively maintain, this solution is lower latency, and more reliable. In the above image, you can see that, using my HA automation solution, when a light switch is toggled, the circadian lighting sensor is queried, and there are all these hoops that have to be jumped through just for the lights to turn on to a particular value. With the original solution, the circadian lighting sensor entity is constantly updating a Hue scene by communicating with the Hue Bridge via the Hue API. That way, all the light switch has to do is pull a scene value from the Bridge. No hoops. Just request, and response. Much more efficient.
The perfect solution would have the efficiency of Robert’s fork solution, while achieving the goal of my automation solution and not touching Circadian Lighting’s code. Is that possible? I think so, and its only through documenting everything in this post that I’ve been able to clarify my thoughts on the matter.
I’m envisioning configuring a Home Assistant automation which monitors the Circadian Lighting Sensor for changes. That would be the automation’s “trigger.” Whenever it sees a change in the Circadian Lighting Sensor entity, it would update a scene on the Hue bridge, just like the original fork solution. The complicated part is the mechanism by which it updates this scene.
The automation should be able to communicate with the Hue Bridge directly over the Hue API through REST commands. Otherwise, the automation could trigger a python script that does the same thing. From there, the switch itself would be configured via Hue to simply turn the light on to that scene when toggled. With that setup, we’d have the efficiency of the fork solution, without touching Circadian Lightings code, just as desired.
If its that easy, why haven’t I done it? Well, things are easy in theory. I’m far from an expert on complex Home Assistant automations, let alone working with the Hue API via REST commands, etc. Its going to require some experimentation, and a lot of trial and error. One of these days I’ll get around to it, and I’ll certainly write about it when I do. Maybe even finally put in that pull request! But in the meantime, I hope either the fork solution or the automation solution I’ve detailed here may be helpful to someone. Till next time!