
Google Workspace Enterprise plans (successor to G Suite Business plans) include unlimited Google Drive storage for licensed users, but there is a strict 750Gb limit on data a licensed user can upload to their account within 24 hours. This limit is generally quite reasonable and should not pose an issue. The vast majority of people today do not have internet connections sufficient to upload 750Gb of data within 24 hours even if they wanted to. That being said, some people do have sufficient connections, and I’m happy to count myself among them (Thanks, altafiber!).
With a 250Mb/s upload speed, I have personally run into situations where I happen to need a lot of data, say 800Gb (just over the daily limit), uploaded ASAP. With my connection, I should be able to upload that data in a little more more than 7.5 hours, but instead I’m stuck waiting at least 24. Not the end of the world, but frustrating nonetheless. Recently, I used the time I was stuck waiting due to this limit to explore if there were any ways around it. Turns out, there’s a couple!
The Quick Way
The easiest solution is to compress all the data you want to upload to a single file. Zip, Tar, Rar, whatever, just create a compressed archive of your data. There’s a million tools out there to make that happen (including those built-in to your OS), but I recommend 7-Zip on Windows, and Keka on macOS. Once you have created your archive, Google Drive will allow you to upload a single file (up to 5Tb in size) without cutting you off after you’ve uploaded 750Gb. As soon as that upload completes, assuming 750Gb worth of that file were uploaded within the last 24 hours, you will have triggered your limit and be unable to upload anything else for ~24 hours. Its difficult to tell exactly when the system will unlock and allow uploads again, but hey, at least you got your data uploaded ASAP.
The Interesting Way
What if, for whatever reason, you don’t want to compress your data to an archive? Maybe you don’t have enough disk space to store your data and a zip of your data at the same time. There is another way! It involves the scripted use of rclone and Google Workspace service accounts. I do not necessarily recommend this work-around, and highly doubt Google would smile upon it, but it does exist, is technically interesting, and I’m hardly the first to write about it– so lets discuss.
The general premise of this work-around is embracing the fact that a single account cannot upload more than 750Gb in a day. No way around that fact. So if a single account can’t do it, just use multiple! Simple enough in theory, but takes a bit of setup to implement. Also, while this method does theoretically enable abuse of the service, I do not believe utilizing it is inherently abusive. In my opinion, this method can be utilized ethically so long as it is utilized sparingly, and for data which does not exceed 5Tb in size. Google will, after all, accept 5Tb within a day anyway, so long as you compress first. This just saves you a bit of trouble. I personally have all this setup on my linux-based NAS, in the event I ever need to upload more than 750Gb of data on short notice.
Note
I am hardly the first to discover or publicize this method. There are projects floating around online which enable automating this work-around to great effect, allowing uploading of up to 75Tb a day (100x the usual limit). While I find these projects interesting academically, they are more complex to implement than the method I’ve detailed below. Furthermore, their entire architecture seems to be built around enabling mass abuse of the Google Workspace Enterprise storage system. Unless you plan to abuse that system en masse (and dare Google to terminate your account while you’re at it), I don’t think there is much practical need for the additional complexity these projects introduce.
Implementation
Implementing this method for yourself is relatively simple. Quick, high level overview: We’re going to setup some Google Drive service accounts, create a Shared Drive between you and the service accounts, and setup a bash script to automatically utilize and cycle through those service accounts by uploading to Google Drive via rclone. What is rclone? rclone is a great CLI-based tool which enables easily moving data around from one place to another, much like rsync, except it supports cloud services! It’s the only Google drive client I’m aware of that will allow us to programmatically cycle through different accounts as we upload data.
Creating Service Accounts
To make this happen, we’ll begin by creating a couple service accounts. Why service accounts? Service accounts are able to upload 750Gb of data to Google Drive a day, just like a normal account, but they are not a full user account, so you will not be charged licensing fees for them like you would a normal user.
To create a service account, go to the Google Developer Console. You must have a project– if you do not already have one, create one. Open your project, click on the hamburger menu in the top left, and navigate to IAM & Admin--> Service Accounts. Click the Create Service Account button. You will see the below Create Service Account screen, with 3 steps.
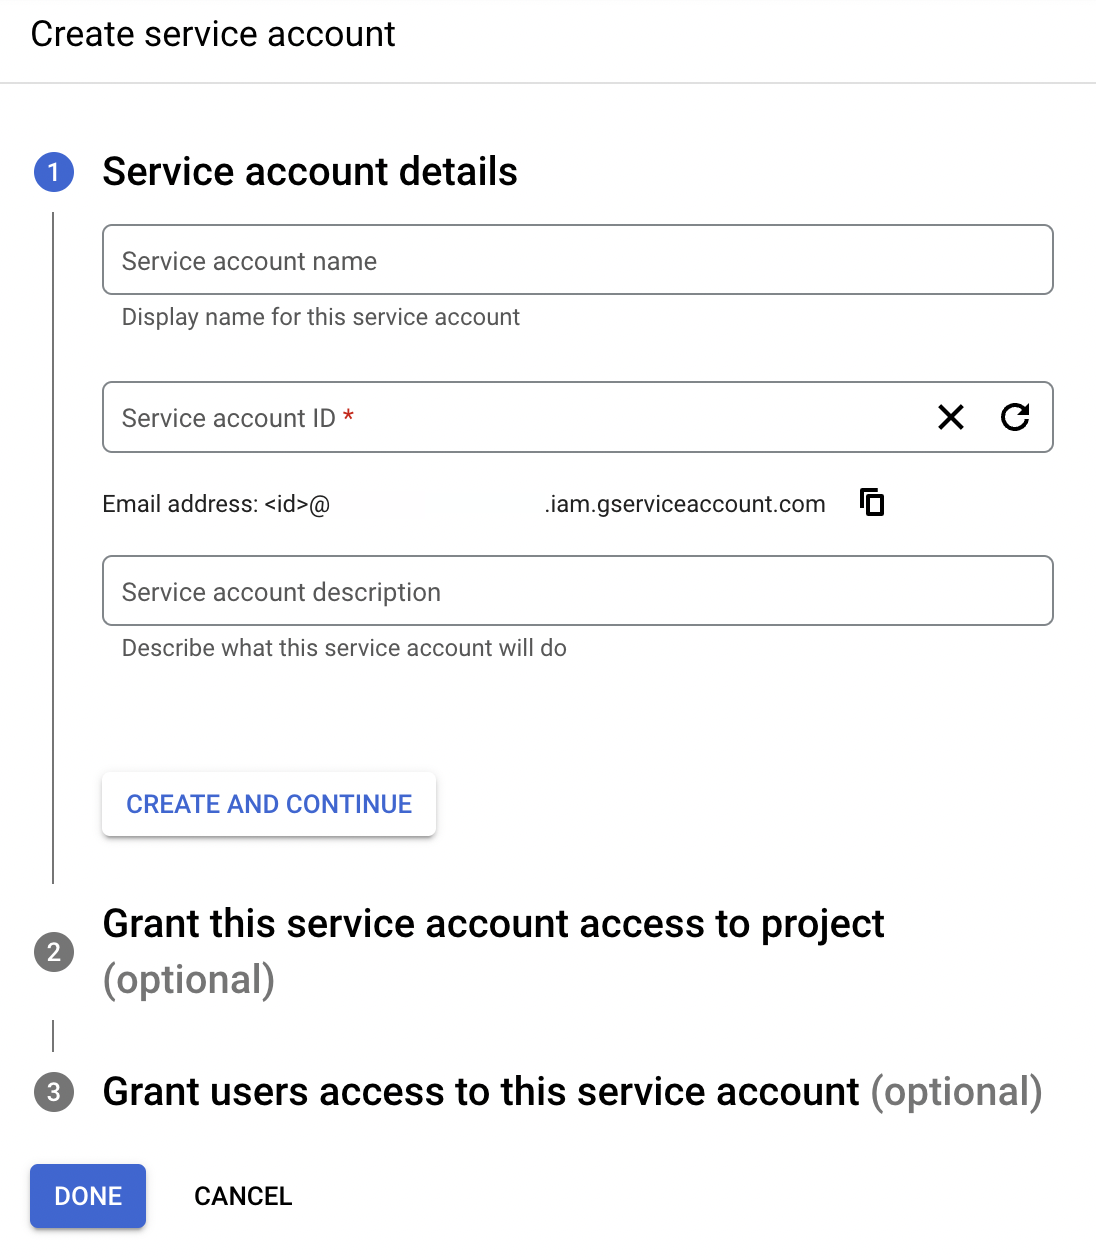
Set a service account name and description. Click Create and Continue. Skip through optional steps 2 and 3.
Click the 3-dot actions button on your newly created service account, and navigate to the “Manage Keys” tab. From there, click Add Key-->Create New Key-->JSON-->Create. You’ll be prompted to download the JSON key you just created. Do so, and save it somewhere memorable.
Repeat these steps to create at least one more service account. In theory, you could create more. Each account can upload 750Gb of data before it hits its limit and we move on to the next one. Personally I setup 4. With my upload speed of 250Mb/s, each account will upload for ~7.5 hours before the 750Gb limit is hit. This allows me to cycle through the 4 accounts over about a 30 hour period before restarting back at beginning and continuing uploading. This worked out great when I needed a little over 3Tb of data uploaded ASAP to share with a co-worker, and zipping the data to an archive was not practical. Do your own math to figure out how many accounts you’ll need to keep your upload live for a full 24-hour period.
Note: When I earlier mentioned projects floating around on the internet– The process of creating projects, groups, and service accounts is the main thing these tools automate. In my opinion, a responsible use of this workaround will use, at most, a handful of service accounts. These tools will create multiple projects, all with the maximum 100 service accounts, enabling uploading truly absurd amounts of data as fast as one’s upload connection will carry it. A single set of 100 service accounts is “limited” at uploading 75Tb a day! Its because of this that I believe there is no reason to use these tools unless you intend to egregiously abuse the system. I recommend just setting up a handful of service accounts by hand- as I’m outlining here in this post.
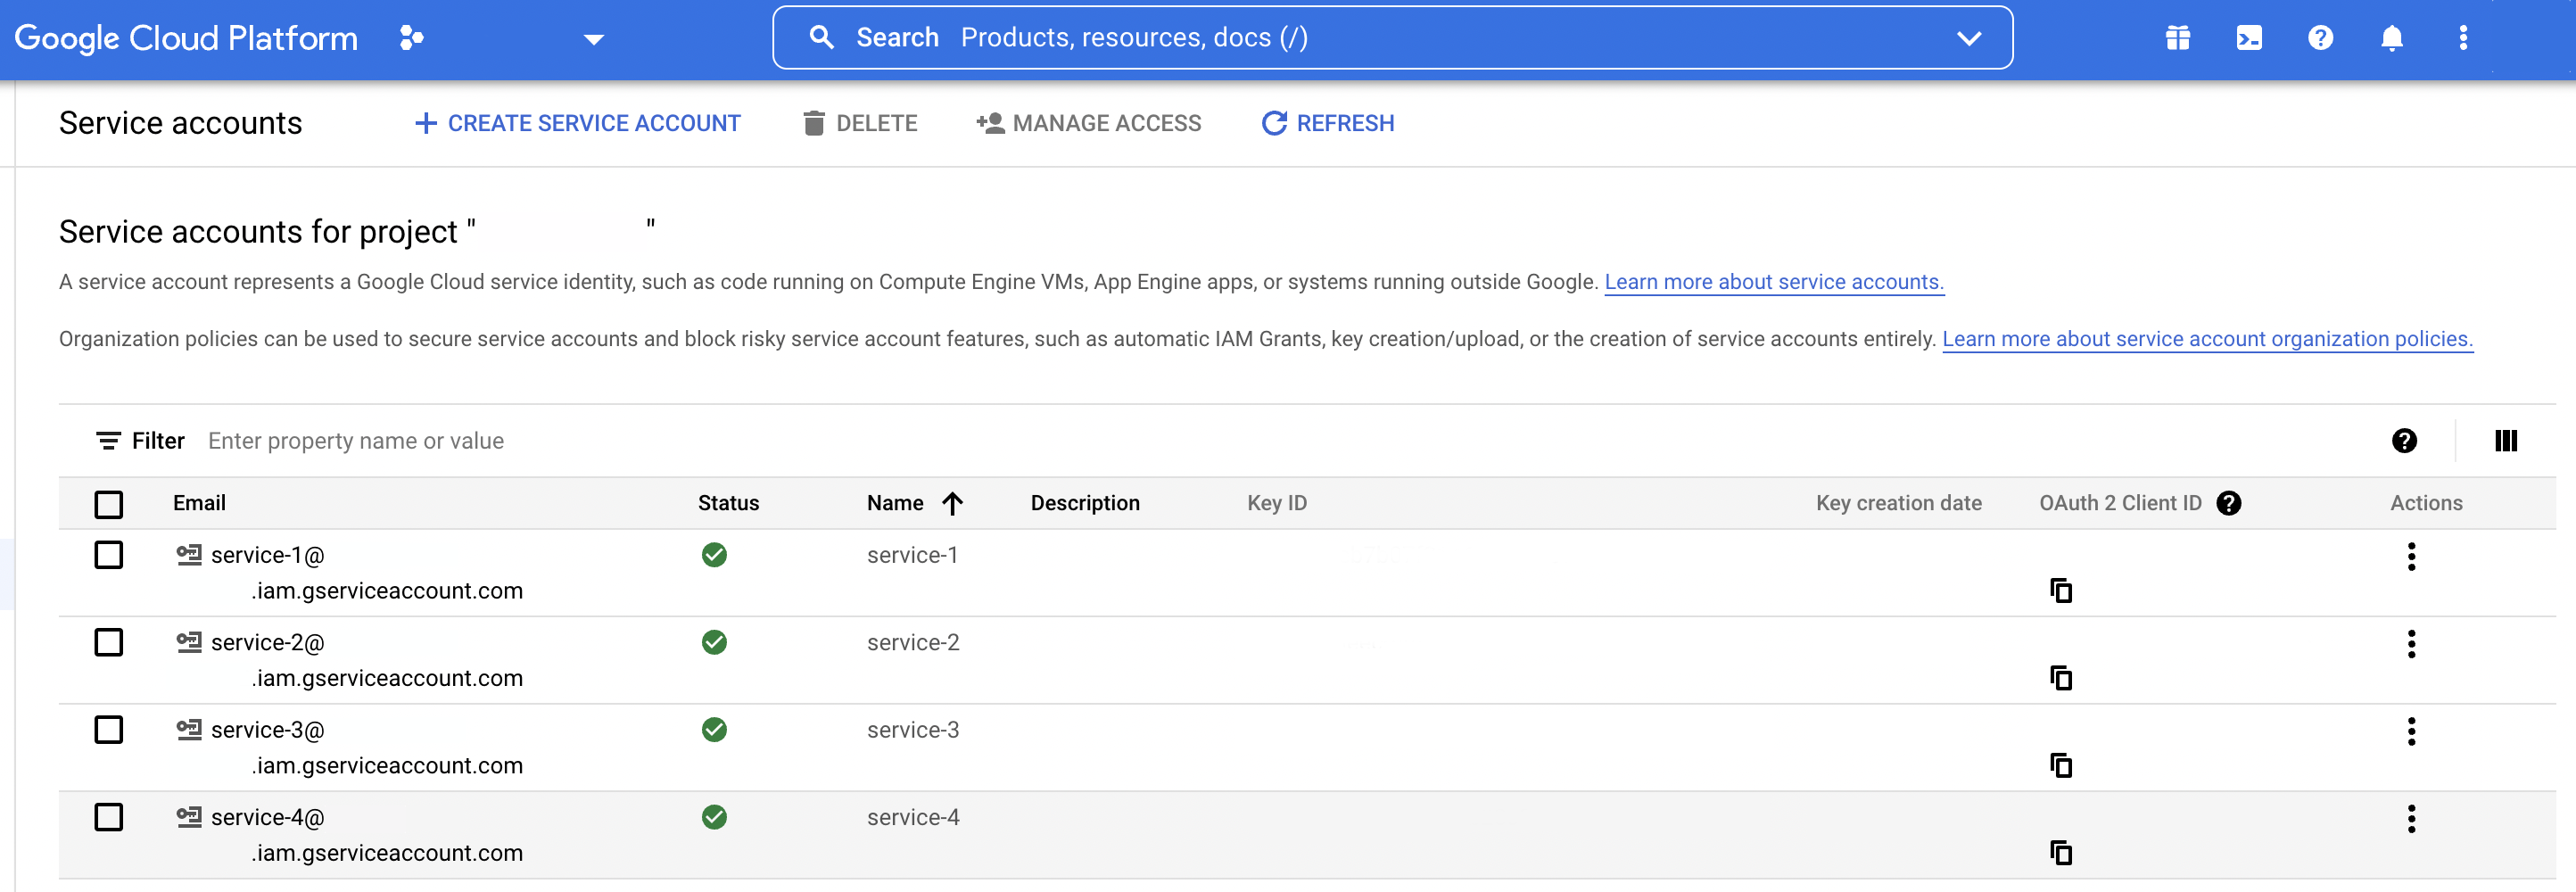
With service accounts created, you should see something like this.
Adding Service Accounts to a Group
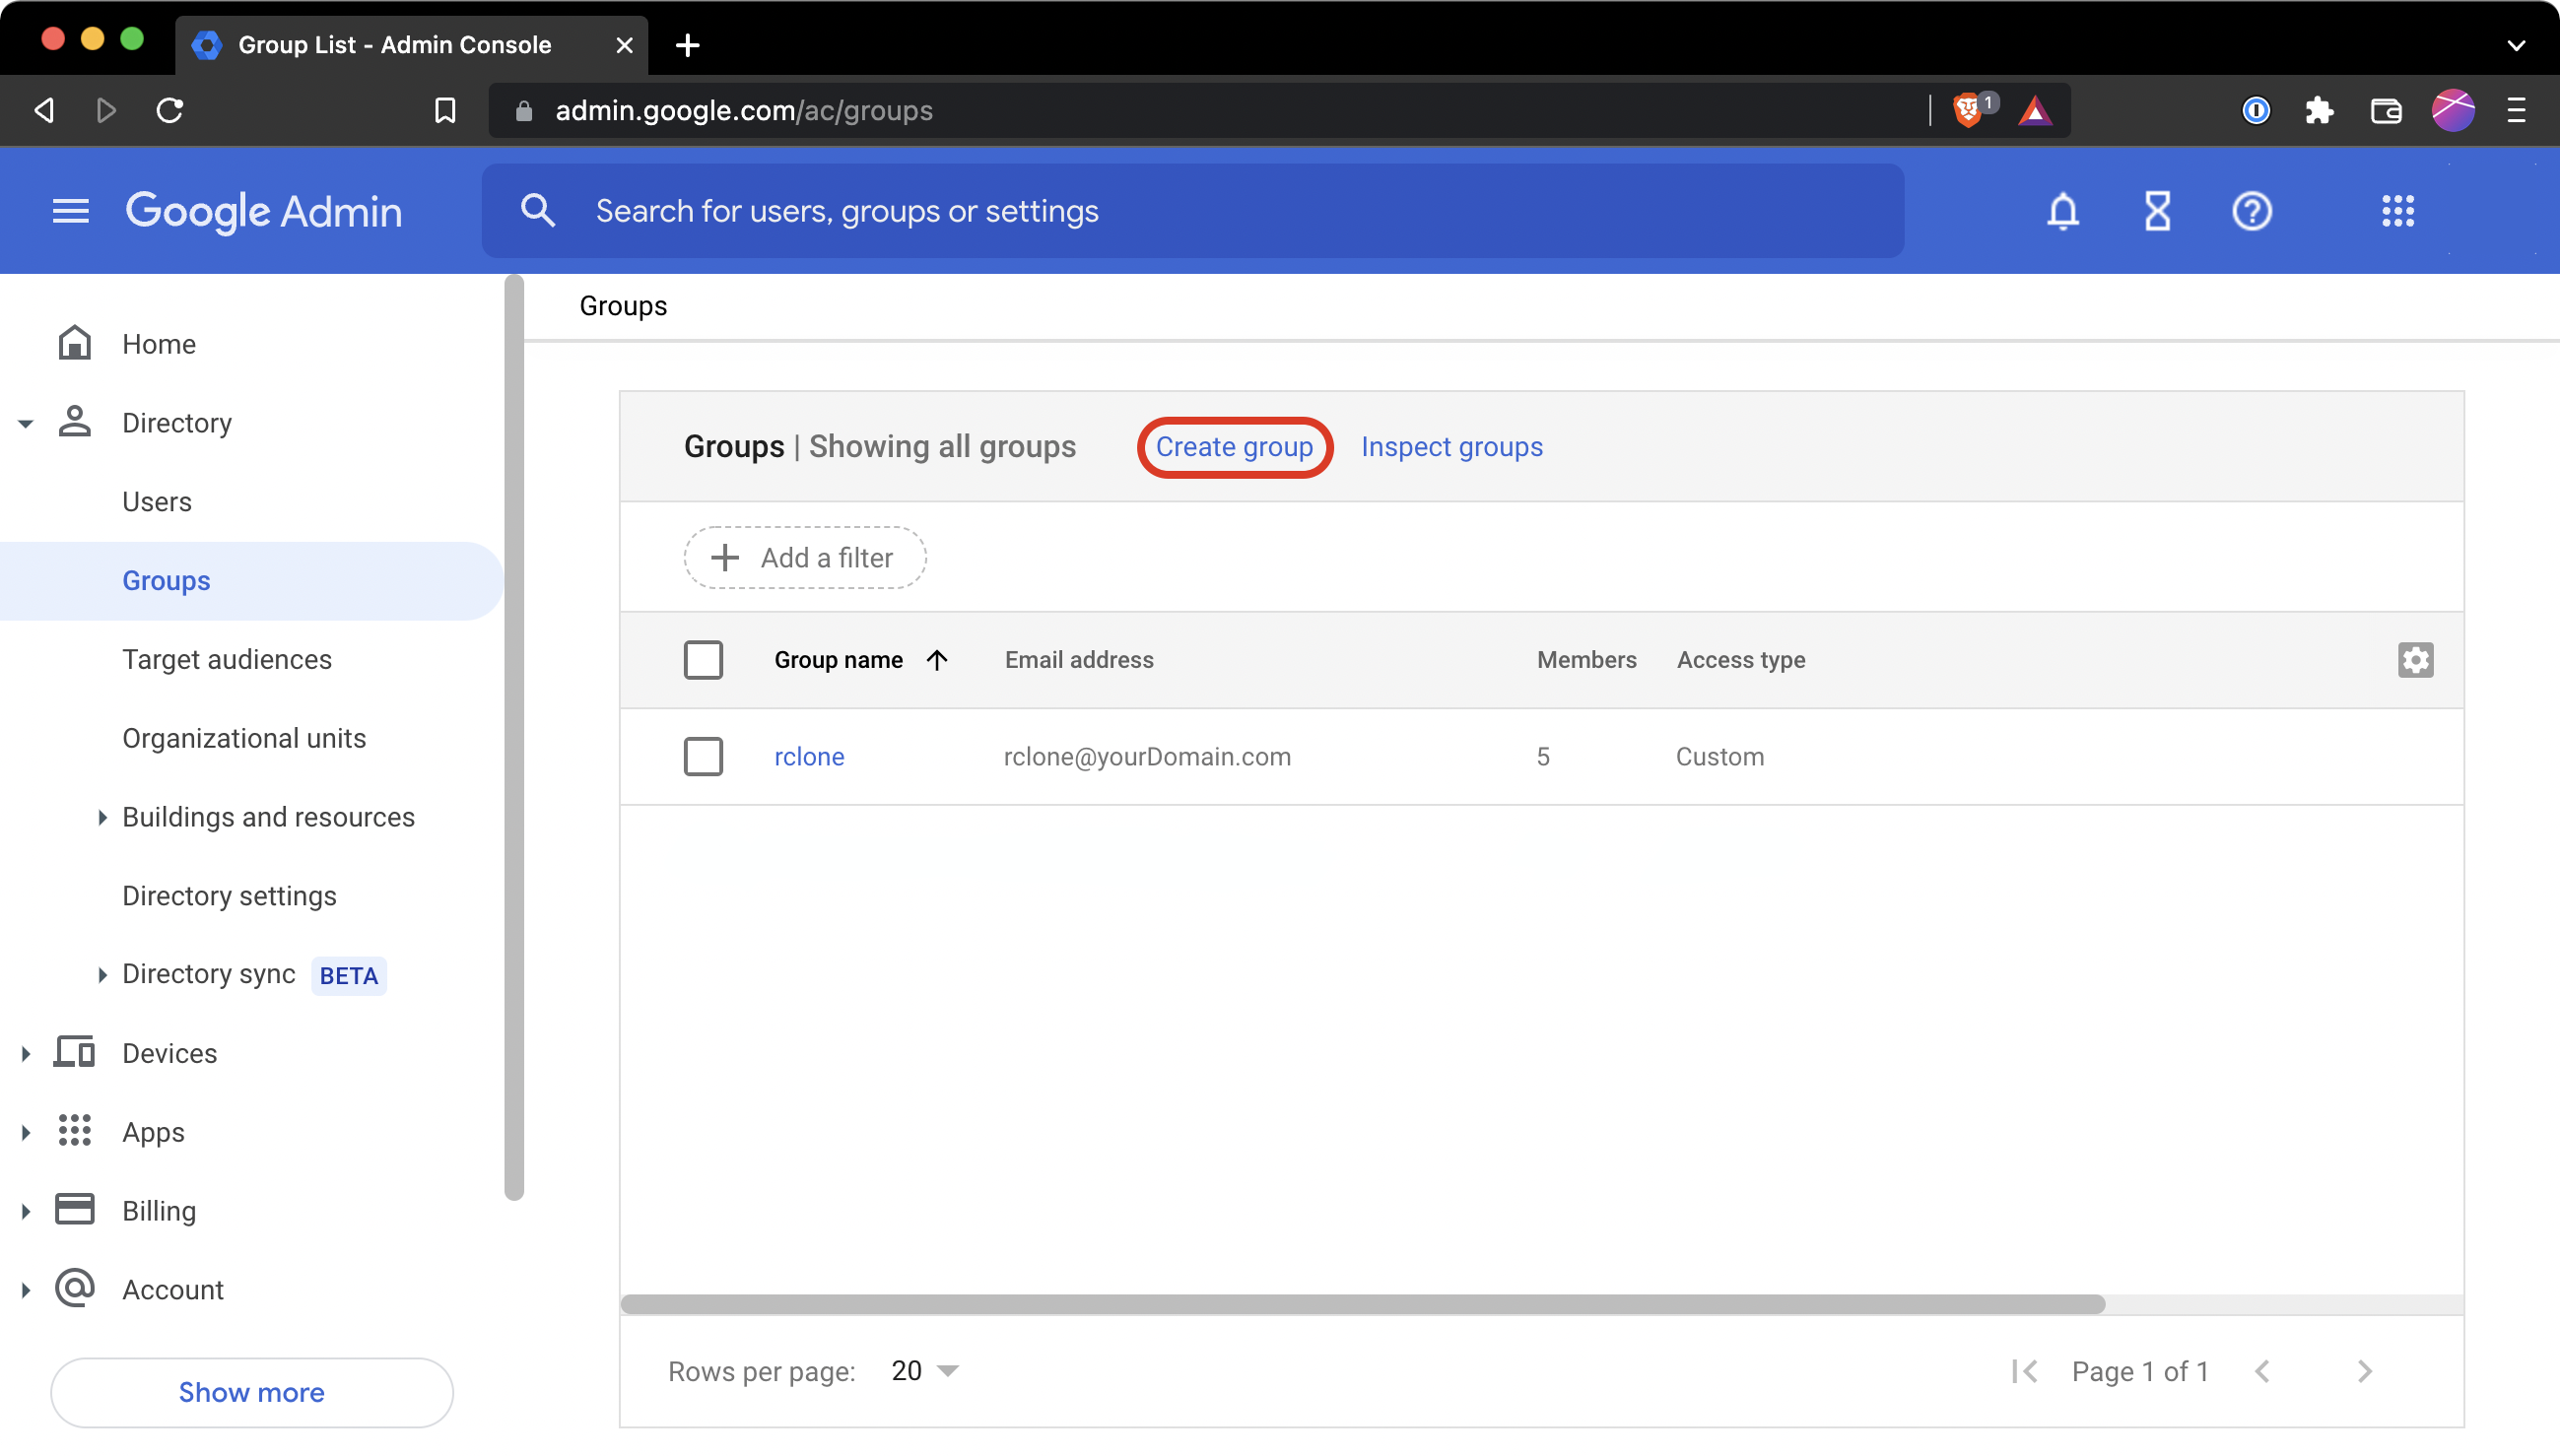
Time to move on to creating a group, where each of the service accounts you just created will be a member. This is helpful because when we create a shared drive, you don’t need to add every service account to it individually, you can just add the group and be done. That being said, we are not creating many service accounts, so you could skip this step and just add the service accounts to the shared drive directly, if you want. Might even be faster if you just have 2 accounts.
Begin by logging into your Google Workspace admin panel at admin.google.com. From the admin panel, navigate to Directory–>Groups on the left-hand sidebar, then click “Create Group”.
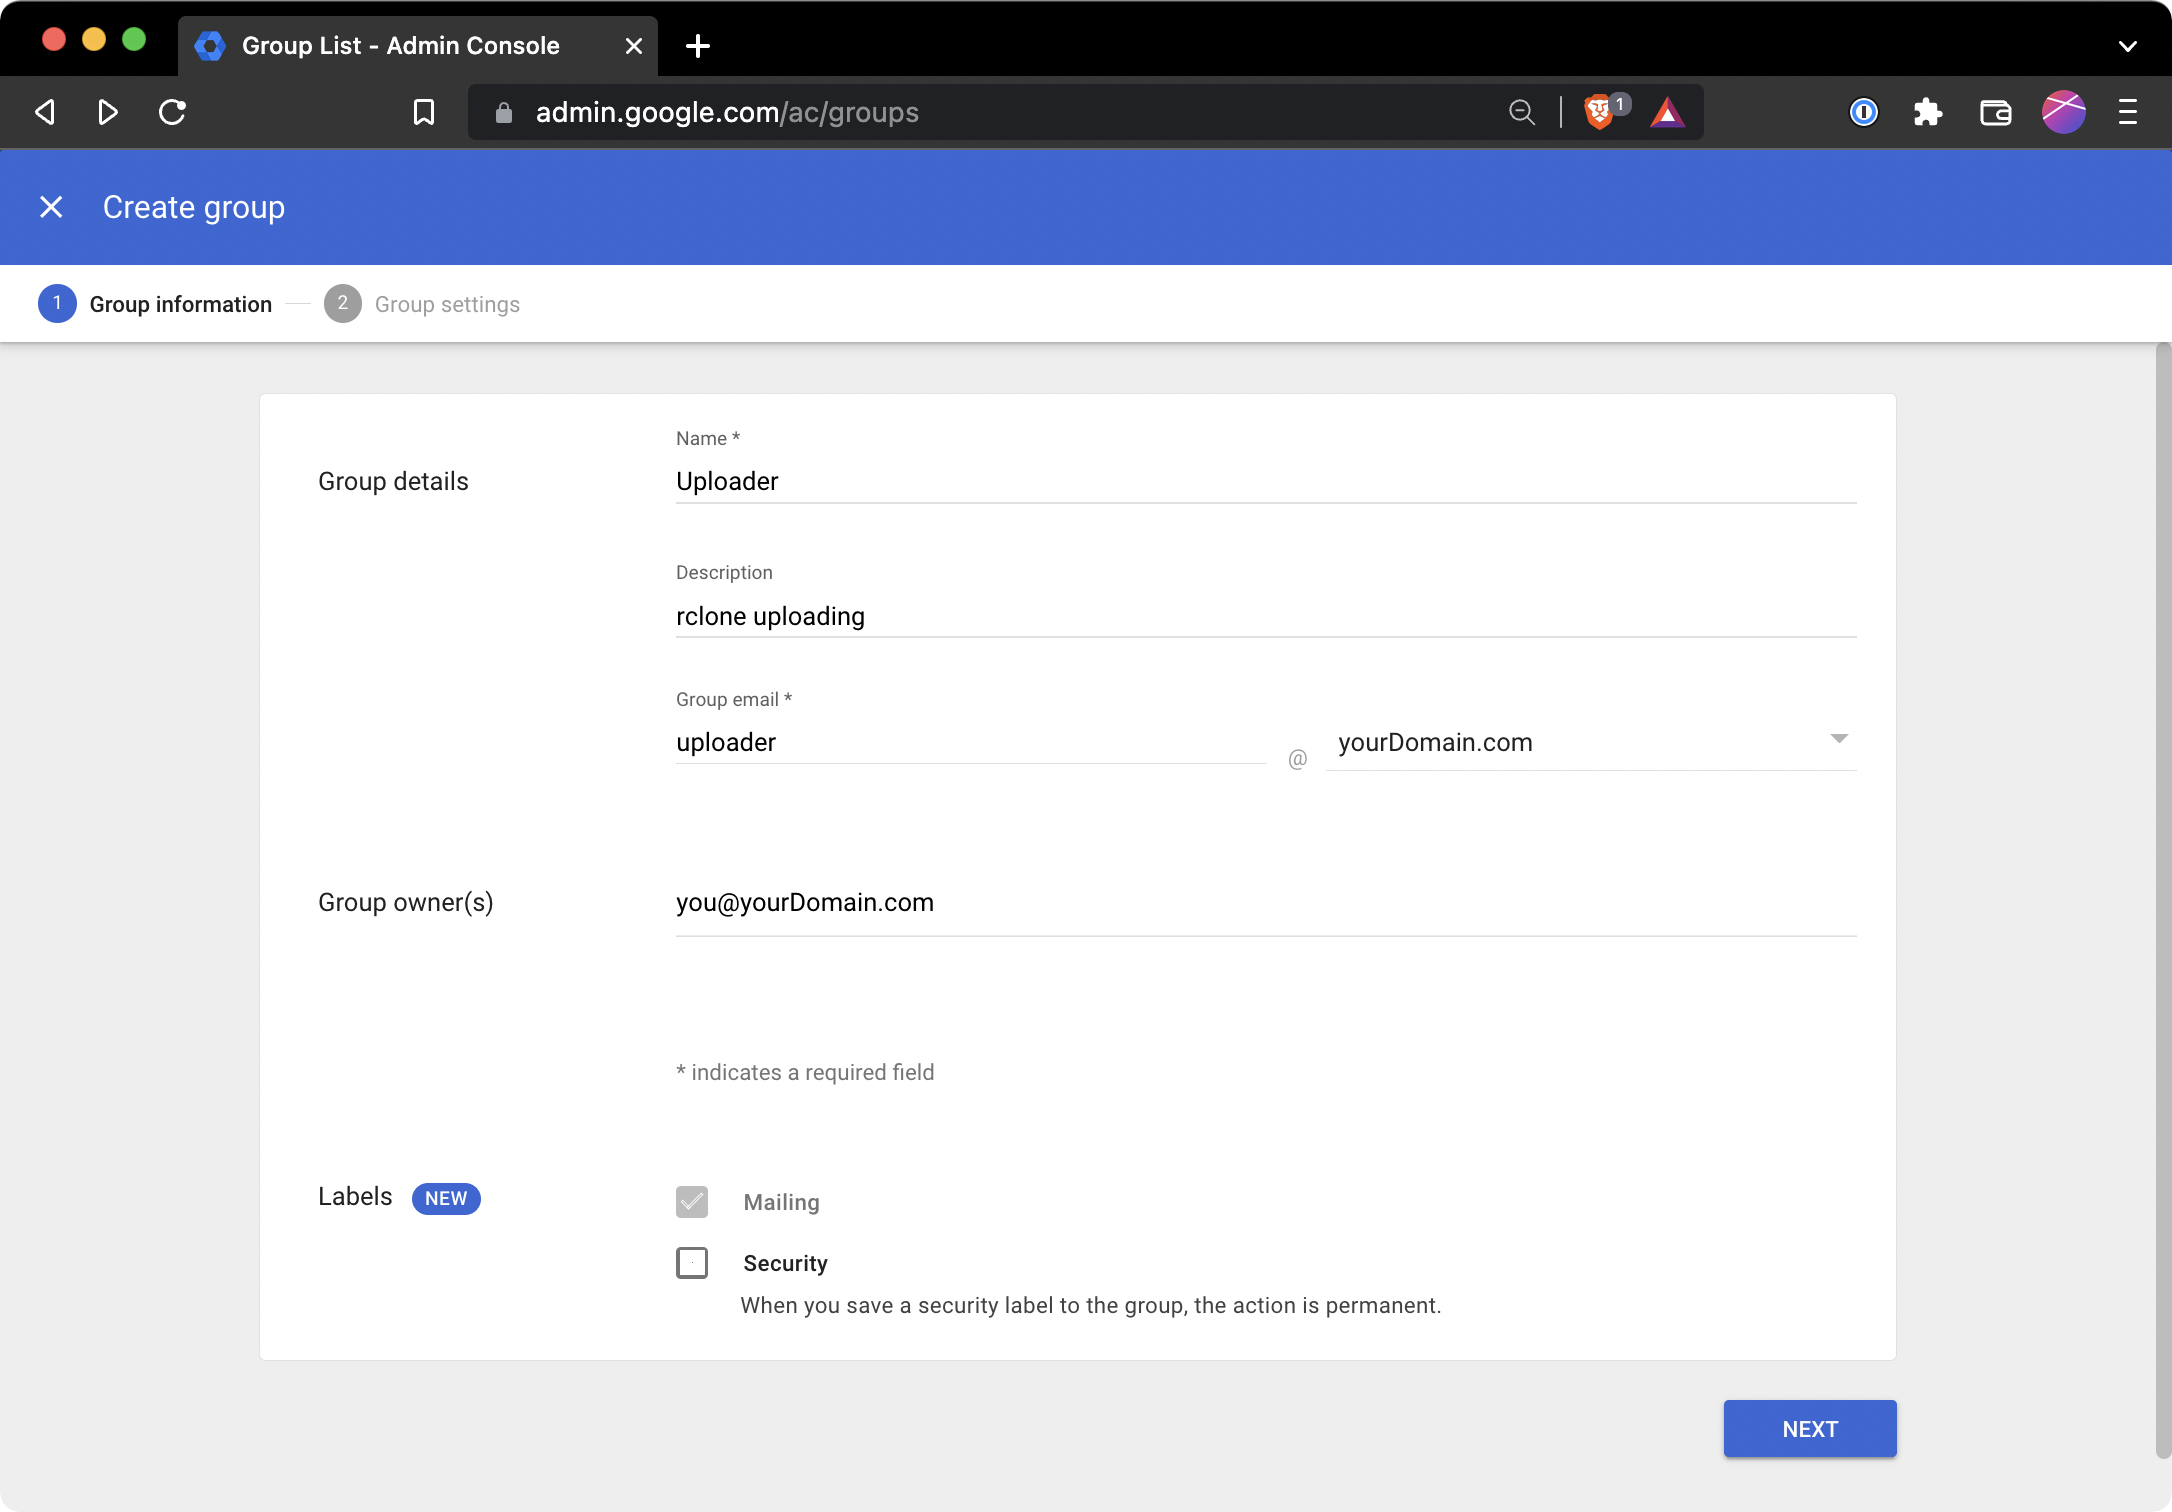
On the Create Group screen, add a name for the group, an email for the group, and set your account to be the group owner.
Click next, and on Group Settings, configure the following:
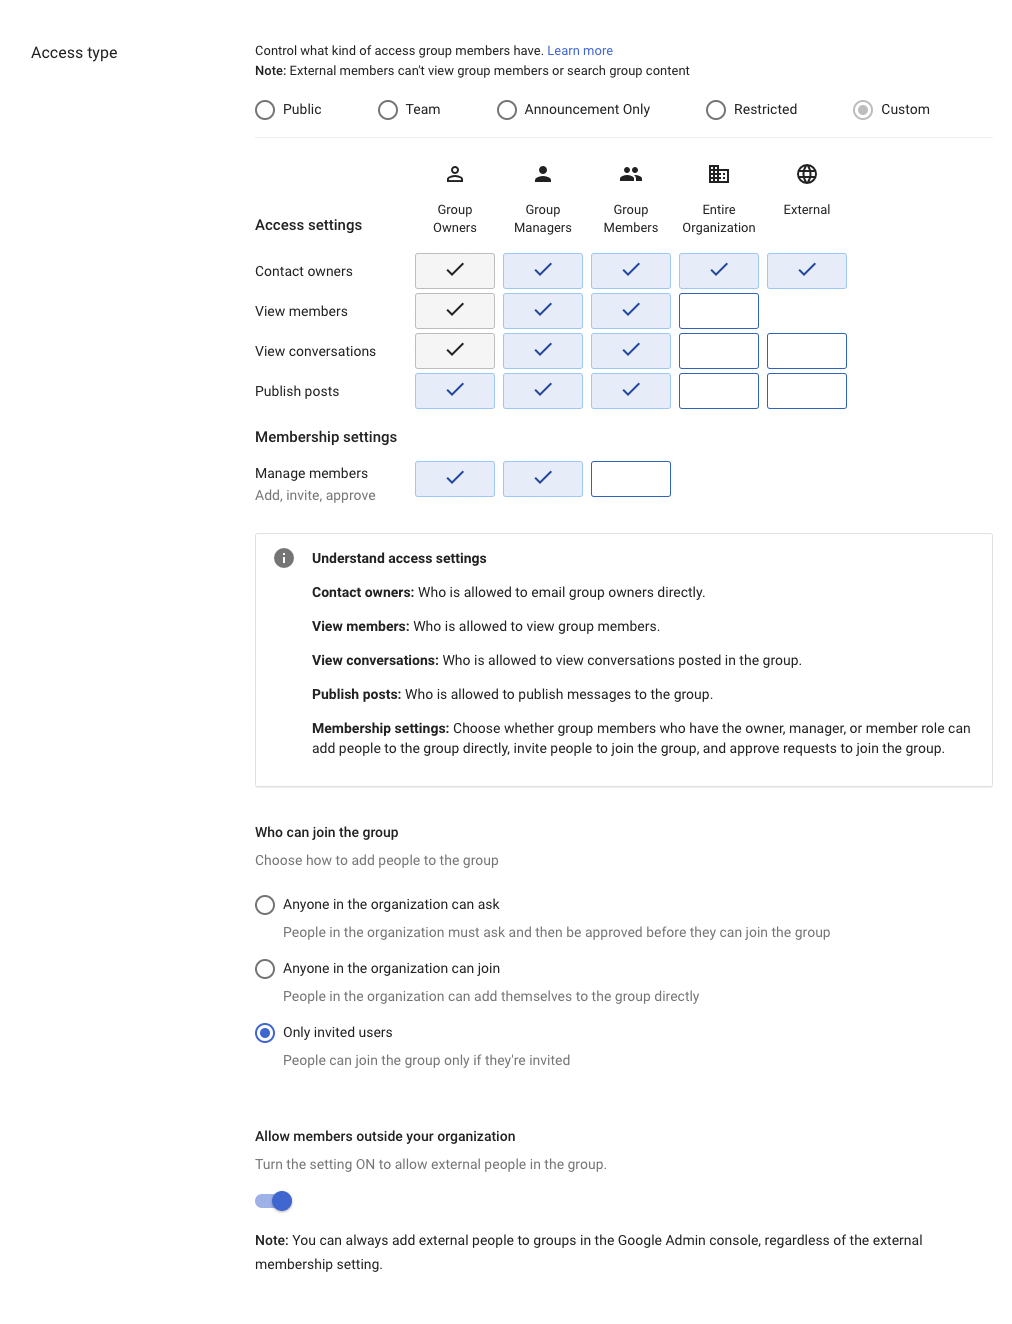
Begin by clicking the Restricted preset, then change ‘Who can join the group?’ to Only Invited Users, and finish by changing the ‘Allow members outside your organization’ toggle to ON.
With the group created, click the Add members, and type in the email address for each of the service accounts you created earlier. When you’re done, click add to group, and we’re almost done with the Google Workspace side of things. Last up, you need to create a shared drive. This shared drive is where all your service accounts will be uploading data to, shared with your primary account.
Creating a Shared Drive
To create a shared drive, navigate to drive.google.com in your browser. Sign into your account, click Shared Drives in the left-hand navigation bar, and click the New button in the top left. Name your shared drive whatever you like and click create. Your shared drive will be automatically opened, then click the Manage Members button. Now, type in the email you assigned to the group you just created, and grant the group Content Manager permissions. This will allow the service accounts in this group to access the shared drive. Consequently, rclone, running logged into these accounts, will be able to read/write/delete files in this shared drive as necessary.
Install rclone and Configure Remotes
First, install rclone. It’s available for many Operating Systems, including Windows, macOS, and Linux. Once rclone is installed, open up a Powershell/Terminal session, and type the following command:
rclone config
Follow the prompts to create a new remote. Give it a name and set it to Google Drive using option 16. Now you’ll need to generate an Application Client ID. This ID is what identifies your instance of rclone to the Google Drive API. If you have any trouble following my next few steps, the rclone-provided instructions may prove helpful, but I think you’ll find them quite similar.
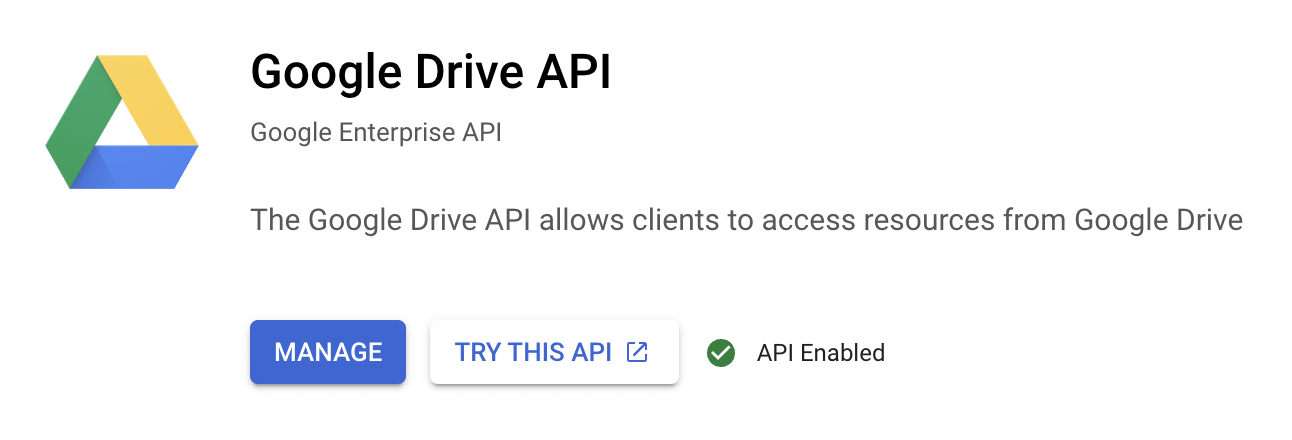
Begin by again logging into the Google Developer Console. Open up the same project you used earlier while creating the service accounts. Using the left-hand navigation bar, navigate to APIs & Services--> Enabled APIs & services. Click the + Enabled APIs and Services button at the top. This will open up the API library. Here, we are going to select the Google Drive API and enable it for this project. Search for Google Drive and enable it, like this:
Now that you’ve enabled the Google Drive API for this project, you can create a credential for rclone to utilize this API by navigating to APIs & Services--> Credentials. Click + Create Credentials and select the OAuth client ID option. You will see the following:
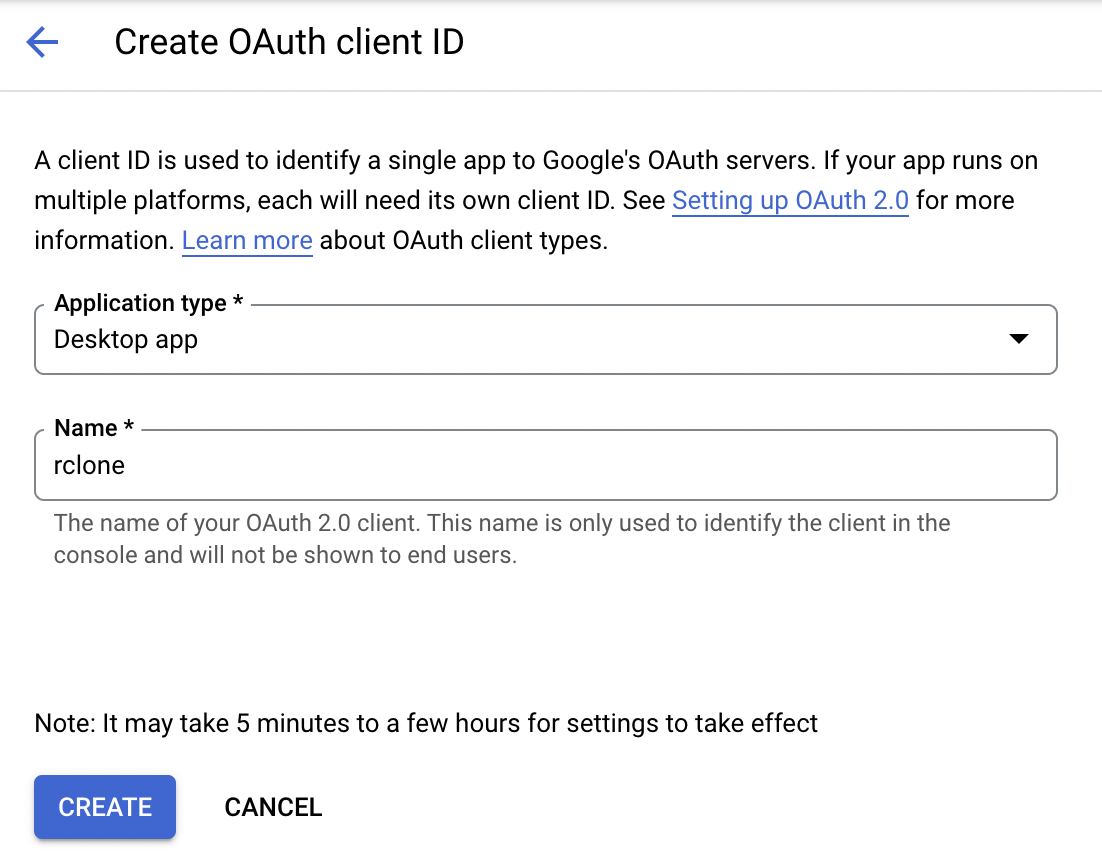
Select Desktop App as the application type, and give the OAuth 2.0 client a name
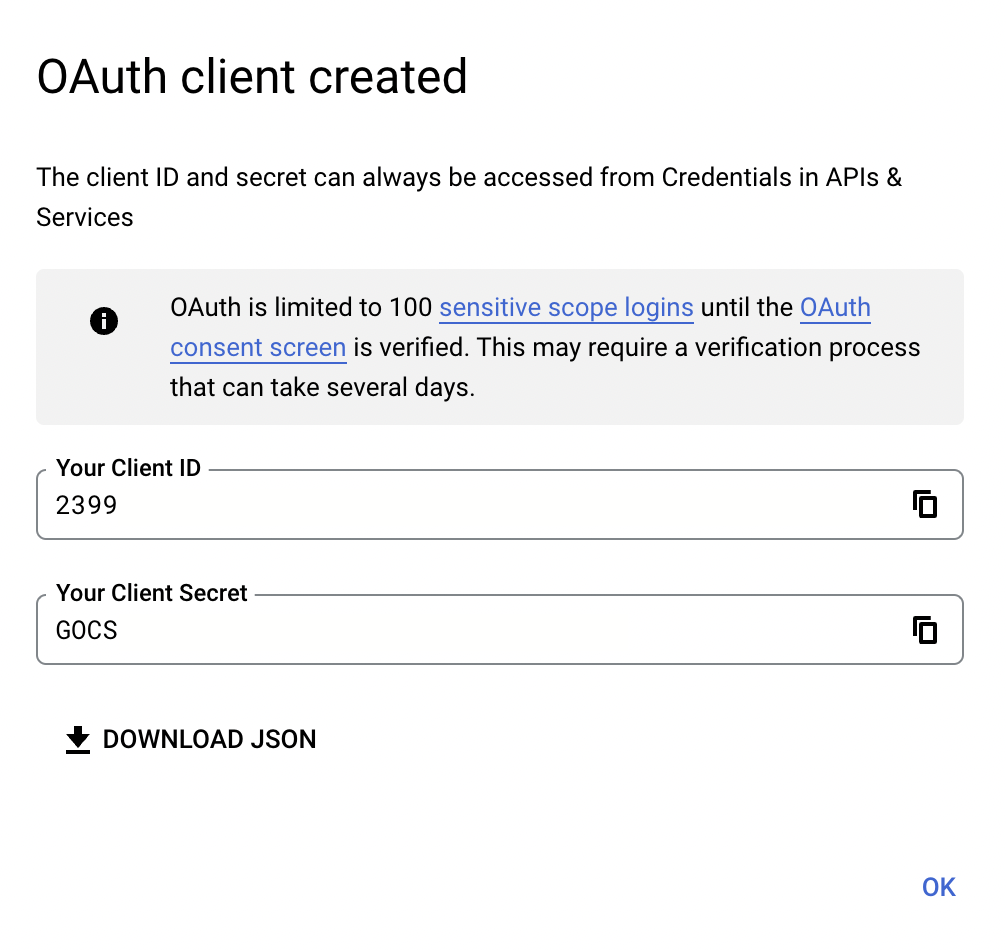
Click create and you will be presented with a client ID and a client secret. Be sure to record both, ideally in your password manager (I recommend 1Password).
Lastly, navigate to APIs & Services--> OAuth Consent Screen and click the Publish App button to go live with “your app” (rclone). Now, with your Client ID created, return to your Powershell/Terminal Session. Copy the Client ID you recorded a moment ago, and paste it into this CLI session. Next, do the same thing with your Client Secret. Continuing on, select option 1 to allow Full access to all files. You will now be asked to specify a root folder. Leaving this blank will allow rclone to download/upload to any folder in your Google Drive. You can also specify a path to lock rclone’s access to a specific directory (see rclone’s Google Drive documentation for more info).
Next up, you’ll be asked to specify the path to your Service Account JSON credentials. This is what allows rclone to run logged in as a service account. You downloaded them earlier, while setting up your service accounts. Decide where you’d like them to “live” on your system long term, and copy/paste that path into your CLI session. Continue to follow the prompts until you are asked “Configure this as a Shared Drive (Team Drive)?” Type y, and select the team drive you created earlier. Then wrap up by selecting Yes this is OK and you’re good to go!
All that is left now is to repeat this process for each of your service accounts. Don’t worry, you can use the same client-ID and client-secret for all of them, so the remaining rclone remote configuration should go much more quickly. Just be sure that you specify a new Service Account JSON credential for each one!
With all your rclone remotes are configured, we’re nearly done. Now you just need to utilize them with a script!
Auto-Cycle Through Service-Accounts with Scripts!
The below bash script will allow you to tie together all the work you’ve done thus far. It will use rclone to begin uploading data to your Shared drive, utilizing a service account until 750Gb has been uploaded, and then switching to the next.
You will need to substitute in your own path for the data you want to upload. Also, you will need to swap in the names of the rclone remotes you created for each of your service accounts. If you have less than 4 remotes, remove lines as necessary, if you have more, add additional ones in the same format.
As I mentioned before, with my internet connection, it takes me ~7.5 hours to upload 750Gb. By the time all 4 of my service accounts have cycled through 750Gb uploaded, I no longer have an upload lock on the first account. With that in mind, If I have more than 3,000Gb to upload, I could simply copy and paste these 4 rclone commands to the end of the script, and it would cycle through every service account twice, uploading nearly 6Tb of data when its all said and done– but then things start to get hairy again, when it comes to abusing the service. Muddy waters, use your best judgment, please don’t abuse the service, you risk your account getting terminated, use at your own risk, don’t give Google reasons to discontinue unlimited cloud storage plans, blah blah blah. I can’t stop you, the information is out there, but its worth bearing in mind nonetheless.
This script is provided in bash, for easy use on Linux and macOS systems. You should be able to easily replicate it in Powershell, should you so desire, or just run it via Windows Subsystem for Linux (WSL). In theory, you could even automate the running of this script using cron jobs, or task scheduler on Windows, to regularly upload data without worrying about upload limits slowing you down (again, abuse disclaimer– only so many times I can say this). Lots of options out there.
I hope you may find this exploration useful in your own bulk-uploading needs but, beyond that, that it might serve as a practical introduction to scripting with rclone. rclone is a great tool to have in your back-pocket, and enables working with all kinds of cloud storage providers (not just Google Drive!) in ways that are difficult or impossible using the first-party clients these services provide. You won’t need to develop a custom solution utilizing a given cloud storage provider’s API– rclone has already done it for you!